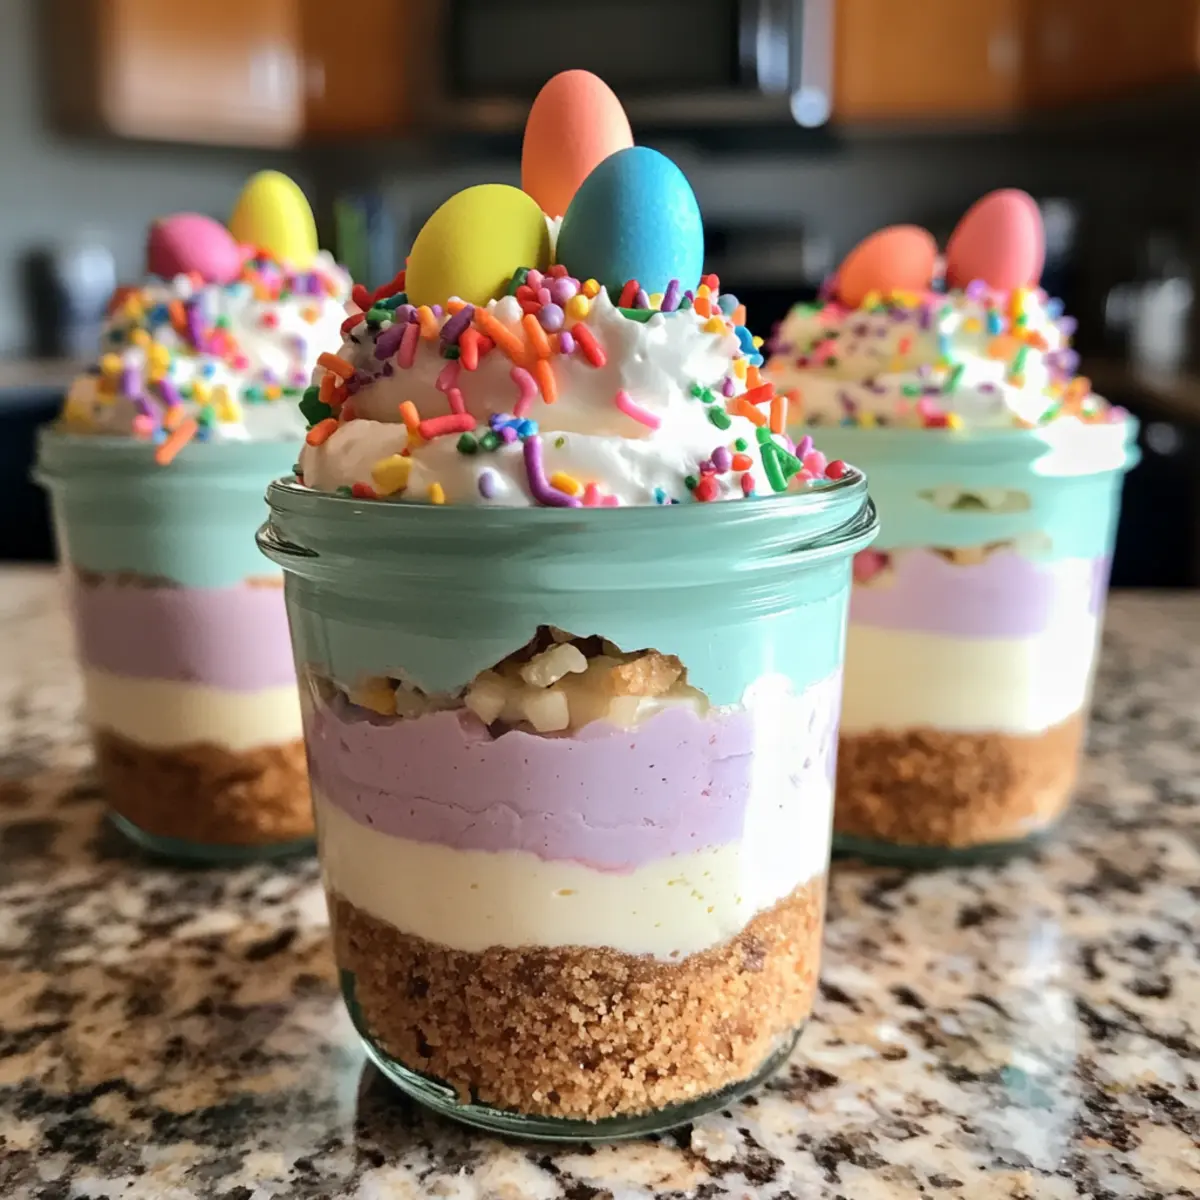
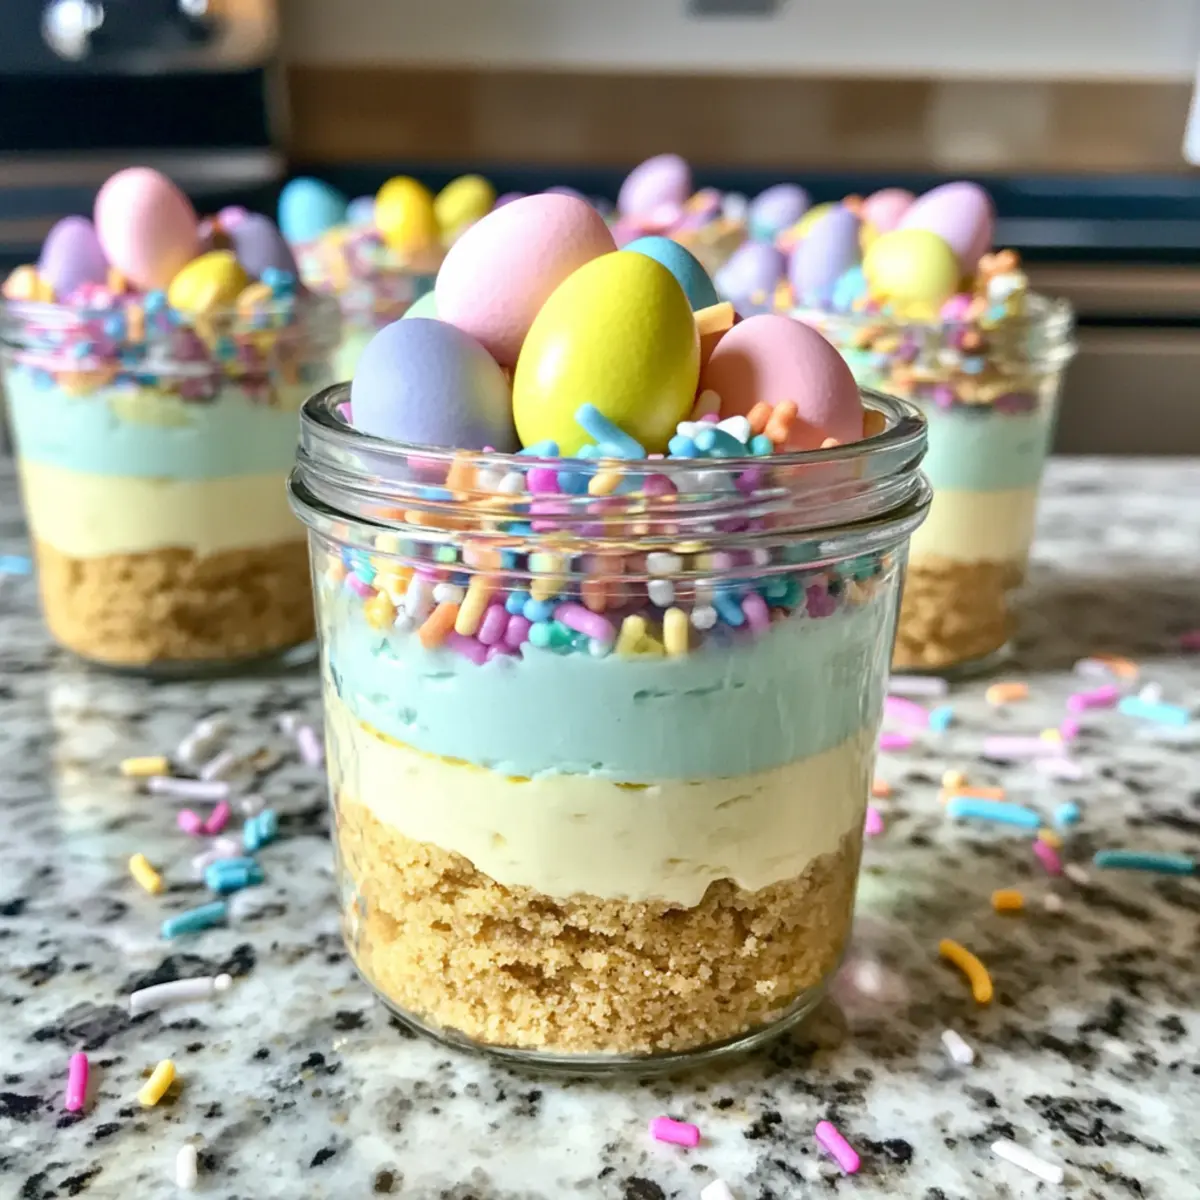
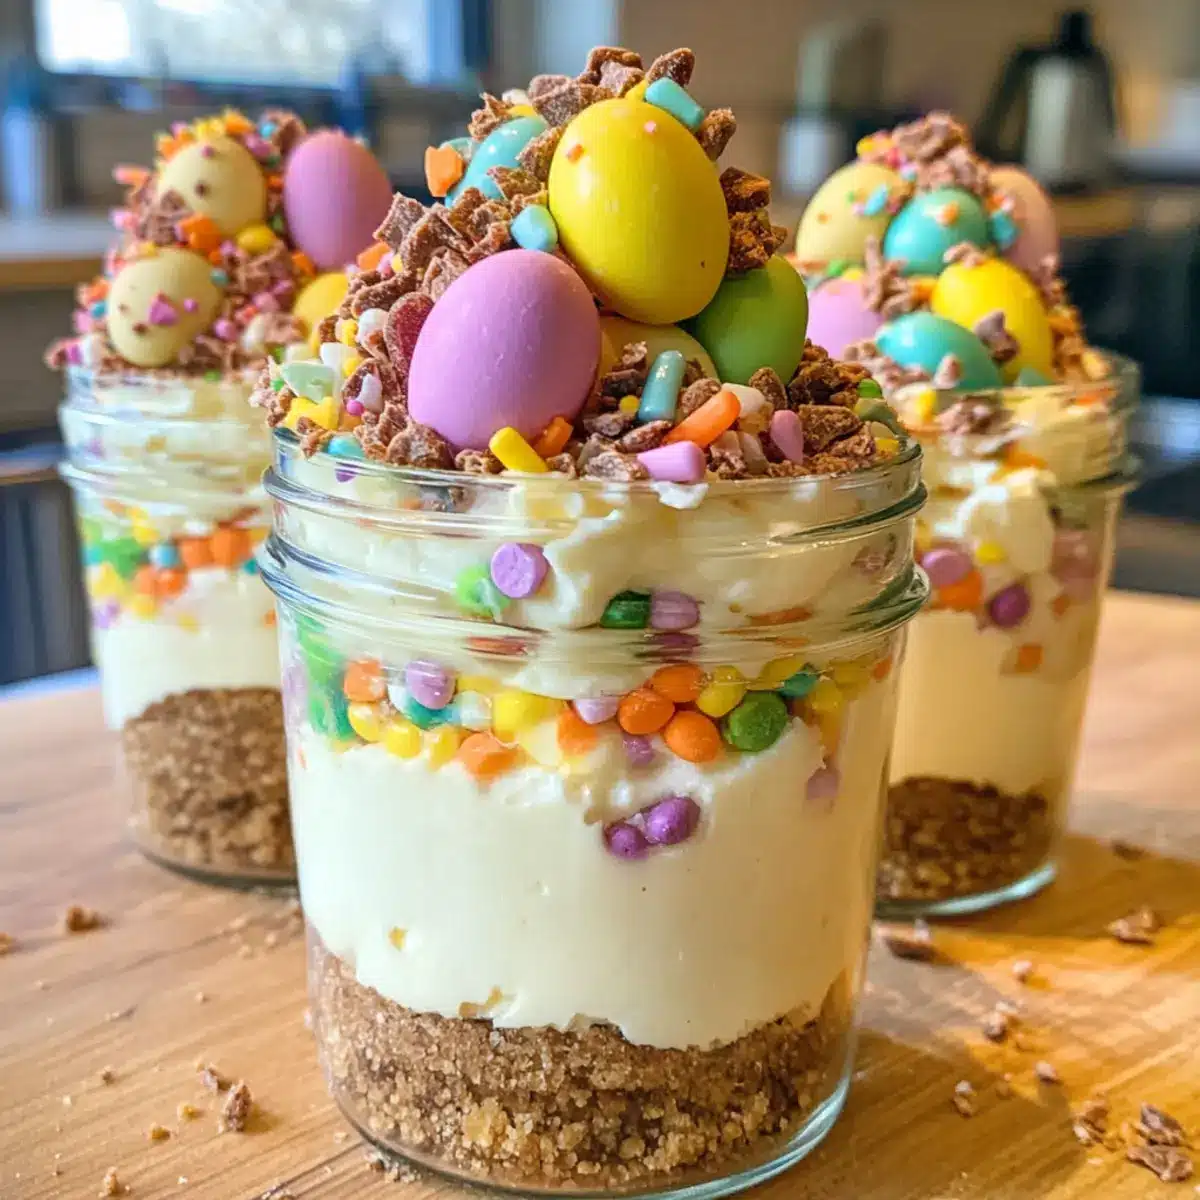
Spring is here, and with it comes the delightful chance to create something beautiful and delicious like these No-Bake Mini Easter Cheesecake Jars. The creamy, airy texture paired with a buttery cookie crust will make these desserts a hit at your next gathering or cozy family dinner. Not only are they quick to whip up, but they also offer a customizable experience that allows you to bring your own seasonal flair to the table. Plus, they’re completely kid-friendly, so little ones can join in on the fun of decorating with colorful toppings like pastel candies and sprinkles. Ready to bring some joy to your spring celebrations? Let’s dive into this delightful recipe!
Why Are Mini Easter Cheesecake Jars Perfect?
No-Bake Convenience: Enjoy the ease of creating these delightful treats without turning on the oven, making them perfect for warm spring days.
Customizable Fun: From vibrant gel colors to a variety of toppings, these jars invite creativity, allowing you to personalize each dessert to suit your taste.
Crowd-Pleasing Appeal: With their charming presentation and delicious flavor, they’re a hit at any gathering, whether it’s a festive Easter brunch or a cozy family dinner.
Kid-Friendly Joy: Kids love helping create and decorate these jars, making them an engaging activity for the whole family to enjoy together.
Make-Ahead Delight: Prepare these Mini Easter Cheesecake Jars up to 24 hours in advance for a hassle-free dessert that will impress guests with minimal effort.
Mini Easter Cheesecake Ingredients
For the Crust
• Graham Cracker Crumbs – The perfect base for a deliciously crunchy crust; substitute with digestive biscuits if preferred.
• Unsalted Butter – Binds the crust together; make sure it’s melted for easy mixing.
• Sugar – Elevates the sweetness of the crust; try brown sugar for a richer flavor.
• Salt – Balances the sweetness, enhancing the overall taste profile.
For the Cheesecake Filling
• Cream Cheese – The main ingredient for a creamy cheesecake filling; ensure it’s room temperature to avoid lumps.
• Powdered Sugar – Sweetens and smooths the filling; granulated sugar can work but may lead to graininess.
• Vanilla Extract – Adds depth to the flavor; swap with almond extract for a different twist.
• Lemon Juice – Brightens the filling; fresh juice is best for maximum flavor.
• Heavy Whipping Cream – Makes the filling light and airy; consider using whipped topping for a lighter version.
Optional Additions
• Gel Food Coloring – Use to create lovely pastel hues in your cheesecake; optional if a classic look is preferred.
• Mini Chocolate Eggs/Jelly Beans – Fun, festive toppings that capture the Easter spirit; feel free to substitute with seasonal fruits.
• Pastel Sprinkles – A decorative touch that adds color and joy to the dessert.
• Shredded Coconut – Optional, can be dyed green to mimic grass on top of the jars.
These Mini Easter Cheesecake Jars are not only a treat for the taste buds but also a visual delight!
Step‑by‑Step Instructions for Mini Easter Cheesecake
Step 1: Prepare the Crust
In a medium bowl, combine the graham cracker crumbs, sugar, and salt. Pour in the melted unsalted butter and mix until the mixture resembles wet sand. Press the mixture firmly into the bottoms of small jars or cups, ensuring an even layer. This will be the buttery foundation of your Mini Easter Cheesecake Jars, which you’ll set aside while preparing the filling.
Step 2: Whip the Cream
Using a chilled mixing bowl and beaters, whip the heavy whipping cream on medium speed until medium-stiff peaks form, taking about 3-5 minutes. The cream should be fluffy and hold its shape but not be overwhipped. Once ready, set the whipped cream aside, ensuring it stays cool as you move on to creating the cheesecake filling.
Step 3: Cream Mixture
In a large bowl, beat the softened cream cheese with powdered sugar, vanilla extract, and freshly squeezed lemon juice using an electric mixer. Continue mixing on medium speed until the mixture is smooth and fluffy, approximately 2-3 minutes. Be sure there are no lumps; the goal is a creamy filling that will beautifully complement the crust in your Mini Easter Cheesecake Jars.
Step 4: Combine
Gently fold the whipped cream into the cream cheese mixture in two additions using a spatula. Start with one-third of the whipped cream, folding it in carefully until just combined, then add the remaining whipped cream. This step is crucial to maintain the light and airy texture of the filling, ensuring your Mini Easter Cheesecake Jars are delightful and fluffy.
Step 5: Color (optional)
If desired, divide the cheesecake filling into smaller bowls and add a few drops of gel food coloring to each. Gently stir the colors into the filling until you achieve your desired pastel hues. This is a fun step to add a cheerful and vibrant look to your Mini Easter Cheesecake Jars, making them even more festive for spring celebrations.
Step 6: Fill Jars
Using a spoon or a piping bag, fill each jar with the cheesecake mixture over the prepared crust, smoothing the top with a spatula. Fill the jars to your preferred height, usually about ¾ full, leaving a little space for the decorative toppings. Each jar should look inviting and lush, setting the stage for a delicious treat!
Step 7: Chill
Cover each jar gently with plastic wrap or a lid and place them in the refrigerator for at least 2 hours. Chilling allows the filling to set and flavors to meld beautifully. When the time is up, the Mini Easter Cheesecake Jars should feel firm to the touch but still creamy on the inside, ready for the final, fun touches.
Step 8: Decorate
Just before serving, add a festive touch to each Mini Easter Cheesecake Jar by topping with shredded coconut, pastel sprinkles, and a few mini chocolate eggs or jelly beans. This step adds not only visual appeal but also a delightful crunch and sweetness, making your jars look tempting and vibrant for your guests.
Step 9: Serve
With the jars beautifully decorated, serve them cold with small spoons for an easy, lovely dessert option. Your family and friends will appreciate the refreshing taste and charming presentation of these Mini Easter Cheesecake Jars, perfect for savoring together during gatherings or cozy celebrations.

Expert Tips for Mini Easter Cheesecake Jars
-
Room Temperature Cream Cheese: Ensuring your cream cheese is at room temperature will help create a smooth filling, preventing any lumps that could detract from the experience.
-
Whip with Care: When whipping the heavy cream, aim for medium-stiff peaks. Over-whipping can turn your cream butter-like, impacting the cheesecake texture.
-
Press the Crust Firmly: For a sturdy base in your Mini Easter Cheesecake Jars, press the crust mixture tightly into the bottoms of the jars to prevent crumbling when served.
-
Chill for Best Results: Allowing your jars to chill for at least 2 hours is essential for the filling to set properly, ensuring the best taste and texture.
-
Add Toppings Last: To maintain the freshest appearance, add your decorative toppings just before serving. This keeps your Mini Easter Cheesecake Jars looking vibrant and inviting!
What to Serve with Mini Easter Cheesecake Jars?
Spring celebrations call for vibrant, delightful pairings to elevate your dessert experience!
- Fresh Berries: Bursting with flavor, ripe strawberries, blueberries, or raspberries add a refreshing contrast to the creamy cheesecakes. They enhance the springtime theme beautifully!
- Minty Fruit Salad: A mixture of seasonal fruits like melons, pineapple, and citrus gently tossed with fresh mint creates a light and zesty complement to the rich cheesecakes.
- Coffee or Tea: Rich coffee or fragrant herbal teas provide a warm balance to the cool, creamy cheesecakes. Their robust notes elevate each bite to something truly special.
- Vanilla Ice Cream: A scoop of smooth, creamy vanilla ice cream is a delightful addition, offering an extra layer of luxury and richness alongside the cheesecake jars.
- Lemonade or Iced Tea: A glass of refreshing lemonade or sweetened iced tea brings a bright, citrusy touch that complements the cheesecake’s flavors perfectly, refreshing your palette.
- Easter Sugar Cookies: These light and crispy treats can be a playful side, echoing the festive spirit and adding texture to the dessert table, making them a fun addition alongside the cheesecakes.
- Chocolate-Covered Strawberries: Juicy strawberries dipped in rich chocolate create a decadent pairing that feels special. Their sweetness works beautifully against the tangy cheesecake filling.
- Coconut Macaroons: Chewy coconut macaroons add delightful texture and sweetness, pairing wonderfully with the creamy, light cheesecakes while emphasizing the festive theme.
Mini Easter Cheesecake Variations & Substitutions
Feel free to make these delightful Mini Easter Cheesecake Jars truly your own by exploring different variations and substitutions that will color your creation with even more joy!
- Gluten-Free: Use gluten-free graham cracker crumbs or almond flour for the crust, ensuring everyone can enjoy this dessert.
- Fruit-Infused: Swirl in some fruit jam or a layer of raspberry compote for a fresh, fruity flavor that beautifully complements the cheesecake.
- Chocolate Lovers: Replace graham crackers with chocolate cookie crumbs for a decadent crust that chocolate lovers will adore.
- Nutty Delight: Incorporate finely chopped nuts or pistachio paste into the filling for an extra crunch; it’s a fun twist on the classic!
- Dairy-Free: Swap cream cheese and heavy cream for dairy alternatives like cashew cream or coconut cream for a vegan-friendly option.
- Decorative Whimsy: For a festive touch, try adding edible flowers on top instead of candies or sprinkles for a beautiful presentation.
- Flavor Burst: Enhance the flavor by adding almond or orange extract instead of vanilla for a bright, aromatic filling enhancing each bite.
Each of these variations can transform your Mini Easter Cheesecake Jars into a unique expression of spring! And for more fun recipes, check out Mini Mushroom Gruyere or get inspired for dessert with this delicious Chocolate Raspberry Cheesecake. Enjoy the process, and happy creating!
Make Ahead Options
These Mini Easter Cheesecake Jars are ideal for busy home cooks looking to save time! You can prepare the cheesecake filling and crust up to 24 hours in advance. Simply mix the crust ingredients, press them into jars, and prepare the cheesecake filling as directed, then refrigerate the jars covered. To maintain the jars’ freshness, keep the toppings, such as sprinkles and mini chocolate eggs, separate until just before serving; this will prevent them from becoming soggy. When you’re ready to impress your guests, just finish by adding your festive toppings and serving chilled for a delightful dessert that’s just as delicious as if made fresh!
How to Store and Freeze Mini Easter Cheesecake
Fridge: Store your Mini Easter Cheesecake Jars in the refrigerator for up to 3 days. Keep them covered with plastic wrap or a lid to maintain freshness.
Make-Ahead: You can assemble these jars up to 24 hours in advance. Just wait to add the fun toppings until right before serving to ensure they stay vibrant and crunchy.
Freezer (optional): If you want to freeze the filled jars, they can be stored for up to 2 months. Ensure they’re airtight and thaw in the fridge overnight before serving.
Reheating: These cheesecakes are served cold and do not require reheating. Enjoy them straight from the fridge for a refreshing treat!
Mini Easter Cheesecake Recipe FAQs
How do I choose ripe ingredients for this recipe?
Absolutely! When selecting cream cheese, look for blocks that are smooth and free of lumps. If choosing fruits or toppings, opt for fresh ingredients that have vivid colors and no dark spots. For example, pick vibrant jelly beans or chocolate eggs that are not damaged to ensure visual appeal in your Mini Easter Cheesecake Jars.
How should I store the Mini Easter Cheesecake Jars?
You can store your Mini Easter Cheesecake Jars in the refrigerator for up to 3 days. Ensure they are covered tightly with plastic wrap or a lid to keep them fresh and prevent any fridge odors from affecting their flavor. A simple trick is to stack them in an airtight container to save space and maintain their integrity!
Can I freeze the Mini Easter Cheesecake Jars?
Sure! These delightful jars can be frozen for up to 2 months. To do this, ensure they are airtight—wrap them tightly with plastic wrap and storage bags. When you’re ready to enjoy, allow them to thaw overnight in the refrigerator for an easy and delightful treat.
What should I do if my cheesecake filling is lumpy?
If you find that your cheesecake filling has lumps, don’t worry! Make sure your cream cheese is at room temperature before mixing; this helps to achieve a smooth texture. If you’ve already mixed it and there are still lumps, you can use a hand mixer to beat the filling again until it becomes smooth. Alternatively, you can push the mixture through a fine-mesh sieve to remove any lumps.
Are there any dietary considerations for this recipe?
Great question! To make the Mini Easter Cheesecake Jars gluten-free, simply use gluten-free graham crackers or digestive biscuits for the crust. Additionally, it’s wise to check for any allergies to specific toppings like chocolate or nuts, especially if you’re serving these at a gathering. Substitute dairy-free cream cheese and whipped topping for a vegan version that everyone can enjoy!
Mini Easter Cheesecake Jars: No-Bake Springtime Delight
Ingredients
Equipment
Method
- In a medium bowl, combine the graham cracker crumbs, sugar, and salt. Pour in the melted unsalted butter and mix until the mixture resembles wet sand. Press into the bottoms of small jars.
- Whip the heavy whipping cream on medium speed in a chilled bowl until medium-stiff peaks form, about 3-5 minutes.
- In a large bowl, beat together softened cream cheese, powdered sugar, vanilla extract, and lemon juice until smooth and fluffy, about 2-3 minutes.
- Gently fold the whipped cream into the cream cheese mixture in two additions.
- Divide the cheesecake filling into bowls and add gel food coloring if desired. Stir until achieving desired colors.
- Fill each jar with the cheesecake mixture over the prepared crust, smoothing the top.
- Cover each jar and refrigerate for at least 2 hours to allow the filling to set.
- Top with shredded coconut, pastel sprinkles, and mini chocolate eggs or jelly beans before serving.
- Serve the jars cold with small spoons.
Leave a Reply