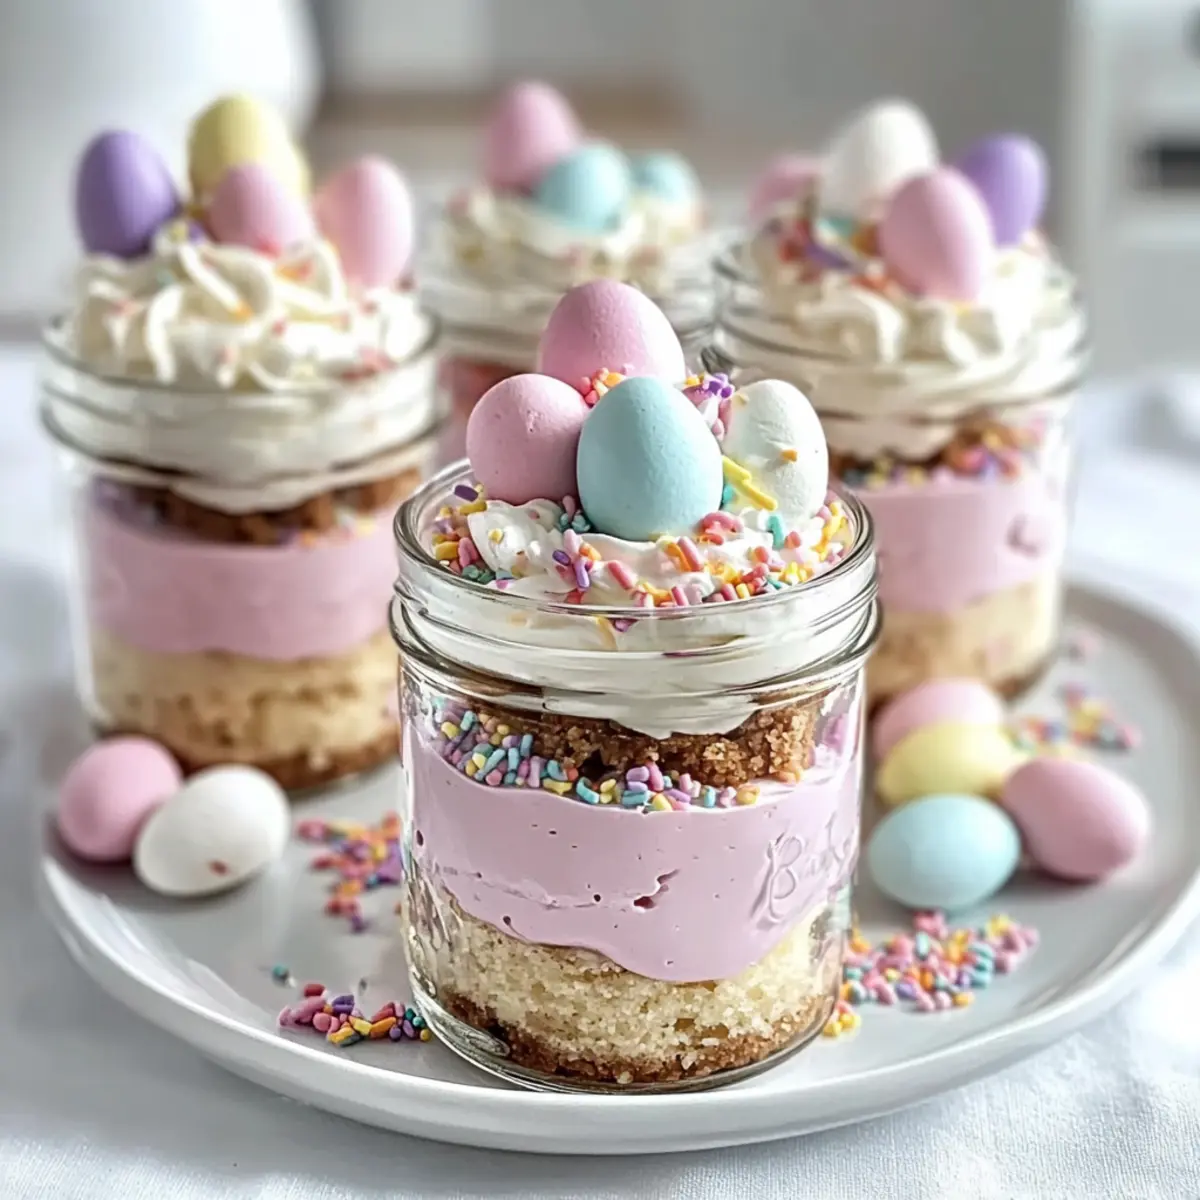
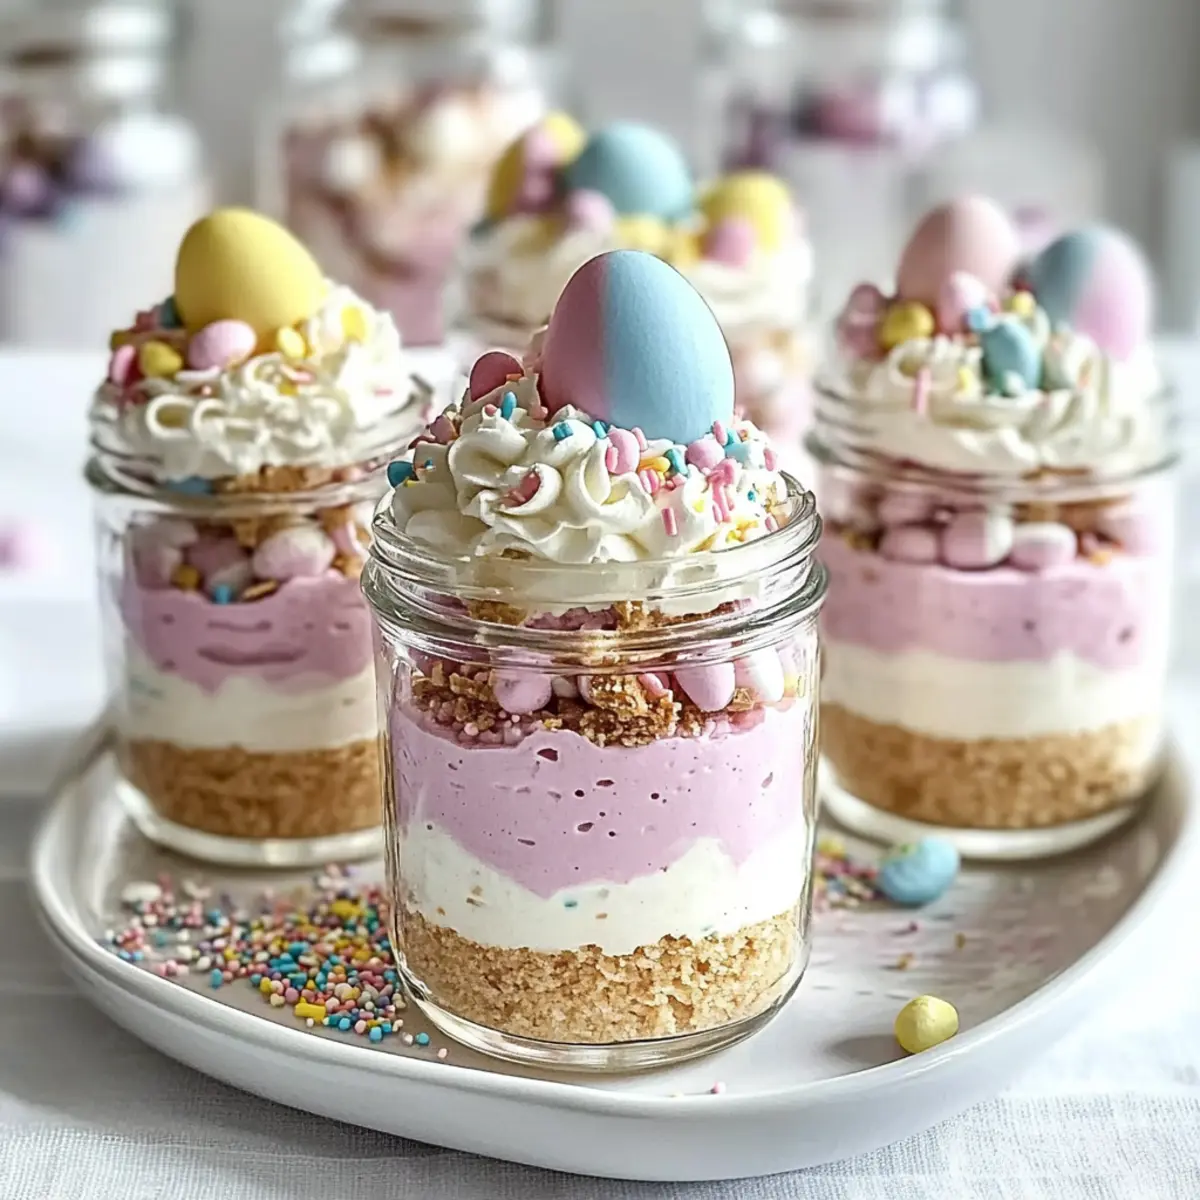
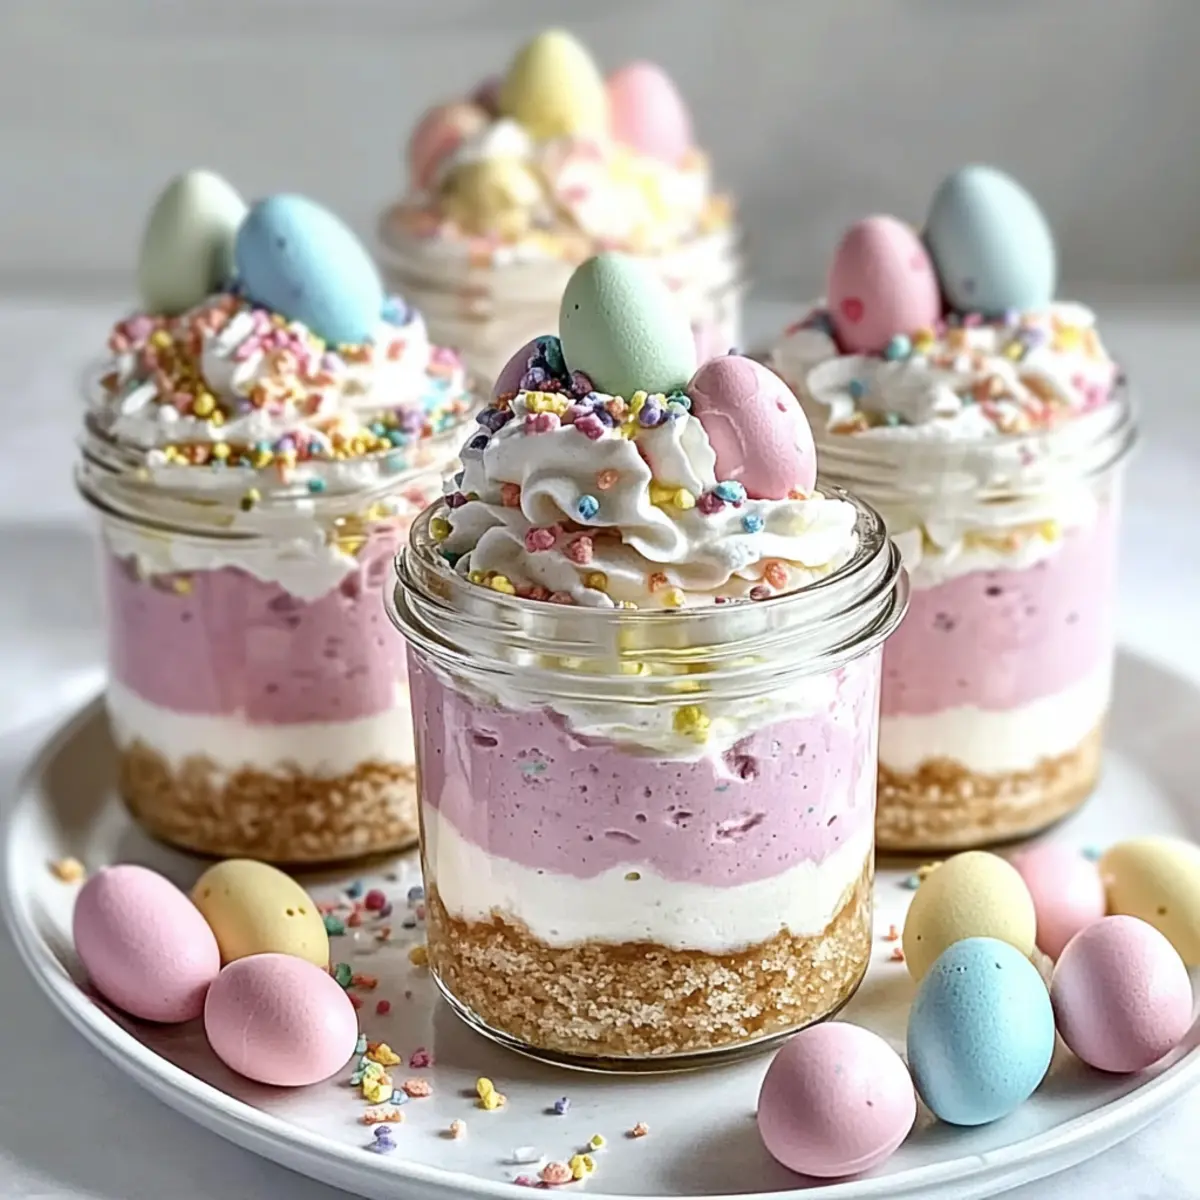
As I was rummaging through my pantry, searching for the perfect spring treat, I stumbled upon a stack of colorful pastel candies. It hit me—what better way to celebrate the season than with these dreamy Easter Egg Cheesecake Jars? With their creamy, no-bake layers and buttery graham cracker crust, these delightful desserts are not just a feast for the eyes but also a breeze to prepare. They’re customizable, so you can get creative with colors and toppings that reflect your festive spirit. Perfect for family gatherings or brunch with friends, these jars promise to add a touch of whimsy and joy to your celebration. Are you ready to whip up a springtime masterpiece that everyone will adore?
Why Are These Cheesecake Jars a Must-Try?
Unforgettable Presentation: These Easter Egg Cheesecake Jars are not only delicious but also gorgeous, making them the centerpiece of any spring gathering.
No-Bake Convenience: Enjoy the ease of a no-bake recipe that saves you time and keeps your kitchen cool during warmer months.
Endless Customization: Get creative with the filling, colors, and toppings, allowing you to cater to your guests’ tastes or seasonal themes.
Crowd Pleaser: The creamy texture combined with the crunchy crust is sure to wow friends and family, making them request seconds!
Stress-Free Preparation: Perfect for busy schedules, you can prepare these jars ahead of time, keeping your hosting duties light and enjoyable.
For more delightful ideas, you can try making a Hawaiian Cheesecake Salad or a Lemon Lavender Cheesecake to complement your spring celebrations!
Easter Egg Cheesecake Jars Ingredients
-
For the Crust
• Graham Cracker Crumbs – Provides structure and crispiness for the base. Substitution: Crushed Oreos or shortbread cookies can be used for a different flavor profile.
• Granulated Sugar – Adds sweetness to the crust. No direct substitution needed; can reduce for a less sweet base.
• Unsalted Butter (melted) – Binds the crust ingredients together for a firm base. Ensure it’s melted to avoid dryness or crumbliness in the crust. -
For the Cheesecake Filling
• Cream Cheese (softened) – The primary ingredient for the cheesecake filling, contributing a rich, creamy texture. Substitution: Neufchâtel cheese for a lighter version.
• Powdered Sugar – Sweetens the cheesecake filling and smooths its texture. Can be substituted with a sugar alternative if desired.
• Vanilla Extract – Adds flavor depth to the cheesecake. Consider using almond extract for variation.
• Heavy Cream – Whipped to stiff peaks for a light, airy filling. Substitution: Coconut cream for a dairy-free version.
• Pink Gel Food Coloring or Freeze-Dried Strawberry Powder (optional) – Adds color to one layer of cheesecake filling. Optional; can omit for a purely white appearance. -
For the Topping
• Whipped Cream – Light, fluffy layer on top of the jars. Make it homemade or use store-bought.
• Pastel Candy Eggs – Decorative and festive treat to place on top, enhancing visual appeal. No direct substitution needed; any small chocolates can work.
• Rainbow or Pastel Sprinkles – For decoration and added color. Omit for a simpler look or use themed sprinkles for specific holidays.
With these delightful Easter Egg Cheesecake Jars ingredients, you’re setting the stage for a creamy, festive dessert that’s perfect for any spring celebration!
Step‑by‑Step Instructions for Easter Egg Cheesecake Jars
Step 1: Prepare the Crust
In a medium bowl, combine the graham cracker crumbs, granulated sugar, and melted unsalted butter. Mix until the mixture resembles damp sand and holds together when pressed. Spoon the crust mixture evenly into the jars, using the back of a spoon or your fingers to press it down firmly to create an even base. Set aside to allow it to firm up.
Step 2: Make the Cheesecake Filling
In a large mixing bowl, beat the softened cream cheese until smooth and creamy, about 2-3 minutes. Gradually add the powdered sugar and vanilla extract, mixing until the filling is airy and well combined. Make sure there are no lumps for a silky texture in your Easter Egg Cheesecake Jars. Scrape down the sides of the bowl as needed for even mixing.
Step 3: Whip Cream
In a separate chilled bowl, add the heavy cream and whip it using an electric mixer on medium-high speed until stiff peaks form, about 3-5 minutes. This airy whipped cream will give your cheesecake a light texture. Be careful not to overmix it; stop once you reach the stiff peak stage, which will make folding into your cheesecake mixture easier.
Step 4: Incorporate Whipped Cream
Gently fold the whipped cream into the cream cheese mixture in two batches. Use a spatula and a gentle motion to avoid deflating the whipped cream. This will create a light and fluffy filling while maintaining the creaminess that makes these Easter Egg Cheesecake Jars so delightful. Make sure it’s well blended without any streaks.
Step 5: Color the Cheesecake
Divide the cheesecake filling evenly between two bowls. If desired, tint one bowl of filling with pink gel food coloring or freeze-dried strawberry powder until the desired hue is achieved. This adds a lovely pastel touch to your Easter Egg Cheesecake Jars, enhancing their visual appeal without overwhelming the flavor.
Step 6: Layer the Filling
Using a piping bag or a spoon, carefully layer the tinted pink cheesecake filling atop the crust in the jars. Follow with a layer of the plain cheesecake filling, smoothing each layer for a polished look. Aim for an even distribution so that each jar showcases beautiful layers of color and creaminess, making your dessert even more tempting.
Step 7: Top the Jars
Before serving, pipe a generous swirl of whipped cream on top of each cheesecake jar. This final touch will give a light and fluffy finish. Decorate with pastel candy eggs and rainbow sprinkles, adding vibrant pops of color. These eye-catching toppings not only enhance the presentation but also celebrate the festive spirit of the Easter Egg Cheesecake Jars.
Step 8: Chill and Serve
Cover the jars and chill them in the refrigerator for at least 2 hours before serving. This chilling step allows the cheesecake layers to set properly, ensuring clean and beautiful presentations when you serve them. Enjoy these delightful Easter Egg Cheesecake Jars at your gathering, delighting friends and family with each creamy, sweet bite.
Expert Tips for Easter Egg Cheesecake Jars
-
Chill Time is Key: Allow the jars to chill for at least 2 hours. This helps the layers set properly and makes for easier serving.
-
No Overmixing: When incorporating the whipped cream into the cream cheese mixture, fold gently to maintain that light and airy texture essential for Easter Egg Cheesecake Jars.
-
Customize Wisely: Feel free to use alternative flavorings or colorings, but ensure any substitutions enhance the overall flavor and presentation of the jars.
-
Perfect Layering: Use a piping bag to create neat layers. This not only looks beautiful but also ensures even distribution of flavors in each jar.
-
Use Quality Ingredients: Since there are few components, using high-quality cream cheese and fresh whipped cream makes all the difference in flavor!
-
Creative Toppings: Experiment with seasonal sprinkles or chocolates; they add a personal touch and enhance the festive appearance of your cheesecake jars.
What to Serve with Easter Egg Cheesecake Jars
As you prepare to impress your guests with these whimsical treats, let’s explore some delightful dishes and beverages that will enhance your festive gathering.
- Fresh Berries: Their tartness balances the sweetness of the cheesecake jars, making for a refreshing bite. Consider a mix of strawberries, blueberries, and raspberries for color and flavor.
- Fluffy Pancakes: Serve a stack of fluffy pancakes drizzled with maple syrup. The warm, buttery pancakes create a cozy complement, drawing in the right sweet and savory vibes.
- Sparkling Lemonade: Bright and bubbly, this refreshing drink adds a zestful lift that contrasts beautifully with the creamy dessert. Garnish with lemon slices for an extra festive touch.
- Mini Quiches: These savory bites not only balance the sweetness but also add a delightful touch of elegance. Their flaky crust and creamy filling make a perfect appetizer to kick off your brunch.
- Spring Salad: Toss together fresh greens, cherry tomatoes, and a light vinaigrette. The crispness and tang will cleanse the palate, making your cheesecake jars feel even more indulgent after each bite.
- Chocolate Mousse: For those wanting a chocolate twist, serve a silky chocolate mousse on the side. The richness of chocolate offers a delightful contrast to the pastel sweetness of the jars.
- Carrot Cake Cupcakes: Celebrate the season with moist carrot cake cupcakes, topped with cream cheese frosting. Their warm spices harmonize perfectly with the flavors in your Easter Egg Cheesecake Jars.
- Iced Tea: A tall glass of chilled iced tea with fresh mint adds a gentle lift, enhancing the overall experience with its herbal notes and coolness.
- Fruit Tart: A light fruit tart can serve as a beautiful and colorful addition, echoing the springtime theme while embracing a slightly tangy element that complements the sweet jars.
Easter Egg Cheesecake Jars Variations & Substitutions
Feel free to let your creativity soar and personalize these delightful jars with exciting twists that cater to your taste!
- Gluten-Free Crust: Use gluten-free graham cracker crumbs or almond flour to keep the base delicious and suitable for those with gluten sensitivities.
- Fruit-Flavored Layers: Swirl in fruit purees like raspberry or mango into your cheesecake filling for a burst of fruity flavor in every bite!
- Nutty Crunch: Add a layer of finely chopped nuts, like walnuts or pecans, between the crust and cheesecake for an extra crunch.
- Chocolate Lover’s Delight: Incorporate cocoa powder into the filling or use chocolate graham crackers for the crust to create a chocolatey version.
- Vegan Alternative: Substitute cream cheese with soaked cashews blended until smooth and replace heavy cream with coconut cream for a plant-based treat.
- Bold Zest: Enhance the flavor with a teaspoon of lemon or lime zest mixed into the cream cheese for a refreshing twist.
- Different Toppings: Swap pastel candy eggs with seasonal fruits or chocolate shavings for a delightful and whimsical appearance year-round.
- Festive Colors: Change the gel food coloring to match other holidays. Imagine vibrant reds for Christmas or tropical colors for summer gatherings!
Why not explore these variations alongside your Chocolate Raspberry Cheesecake or a refreshing Hawaiian Cheesecake Salad to widen your dessert selection? Your loved ones will be thrilled with such delightful options!
Make Ahead Options
These Easter Egg Cheesecake Jars are perfect for busy home cooks looking to save time and enjoy a stress-free celebration! You can prepare the crust and cheesecake filling up to 24 hours in advance; simply store them separately in airtight containers in the refrigerator. To maintain freshness, ensure the crust is well-sealed to prevent it from becoming soggy. When you’re ready to serve, layer the cheesecake filling into the crust, top with whipped cream, pastel candy eggs, and sprinkles, and chill for at least an hour. This way, your delightful cheesecake jars are just as delicious and visually appealing, making your preparation seamless and enjoyable!
How to Store and Freeze Easter Egg Cheesecake Jars
Refrigerator: Store the jars in the fridge for up to 3 days. Keep them covered to prevent drying out and to maintain their creamy texture.
Freezer: These cheesecake jars can be frozen for up to a month. Seal them in airtight containers or wrap them tightly with plastic wrap to prevent freezer burn.
Thawing: To enjoy, transfer the jars from the freezer to the fridge overnight before serving. This gentle thawing ensures the filling remains silky without compromising texture.
Toppings: Avoid adding whipped cream, candy eggs, and sprinkles until just before serving. This keeps your Easter Egg Cheesecake Jars looking fresh and festive!

Easter Egg Cheesecake Jars Recipe FAQs
What is the best way to select ripe ingredients?
Absolutely! For a creamy cheesecake, choose high-quality cream cheese that is well within its expiration date. The fresher, the better! For the whipped cream, make sure it’s whole cream that contains at least 36% fat content for the best whipability. As for your pastel candies, look for ones that are vibrant and free from dark spots, ensuring your jars are festive and visually appealing.
How should I store my Easter Egg Cheesecake Jars?
You can store these jars in the refrigerator for up to 3 days. Keep them covered with plastic wrap or in an airtight container to maintain their creamy texture and prevent drying out. If you want to prepare them in advance, making them a day ahead is a smart strategy!
Can I freeze Easter Egg Cheesecake Jars?
Yes! These delightful jars can be frozen for up to 1 month. To freeze, ensure they are in airtight containers or wrapped tightly with plastic wrap, preventing any freezer burn. When you’re ready to enjoy them, simply transfer the jars to the fridge to thaw overnight—it’s that easy!
What if my cheesecake filling is too runny?
Very common! If your filling is runny, it may be due to overmixing the whipped cream or not using chilled cream cheese. To salvage it, you can try gently folding in more whipped cream to lighten it or adding a bit more powdered sugar, which can help thicken it up slightly. Just remember, gentle folding is key to maintaining that airy texture!
Are there any dietary considerations I should be aware of?
Absolutely! If anyone has lactose intolerance, consider using dairy-free alternatives like coconut cream instead of heavy cream and a dairy-free cream cheese variety. Always check for allergies, especially with toppings. If you’re using sprinkles or certain candies, look for nut-free options to keep your dessert safe for everyone.
How long do the cheesecake jars need to chill before serving?
I recommend chilling the jars for at least 2 hours before serving. This is crucial because it allows the layers to firm up beautifully. Chilling not only enhances the presentation but also ensures a delightful experience when you take that first spoonful!
Easter Egg Cheesecake Jars: Whimsical No-Bake Treats to Wow
Ingredients
Equipment
Method
- In a medium bowl, combine the graham cracker crumbs, granulated sugar, and melted unsalted butter. Mix until the mixture resembles damp sand and holds together when pressed. Spoon the crust mixture evenly into the jars, pressing it down firmly to create an even base. Set aside to allow it to firm up.
- In a large mixing bowl, beat the softened cream cheese until smooth and creamy, about 2-3 minutes. Gradually add the powdered sugar and vanilla extract, mixing until well combined.
- In a separate chilled bowl, add the heavy cream and whip it using an electric mixer on medium-high speed until stiff peaks form, about 3-5 minutes.
- Gently fold the whipped cream into the cream cheese mixture in two batches, ensuring it’s well blended without any streaks.
- Divide the cheesecake filling evenly between two bowls. If desired, tint one bowl with pink gel food coloring or freeze-dried strawberry powder.
- Using a piping bag or a spoon, carefully layer the tinted pink cheesecake filling atop the crust in the jars, followed by a layer of the plain cheesecake filling.
- Before serving, pipe a generous swirl of whipped cream on top of each jar. Decorate with pastel candy eggs and rainbow sprinkles.
- Cover the jars and chill them in the refrigerator for at least 2 hours before serving.
Leave a Reply