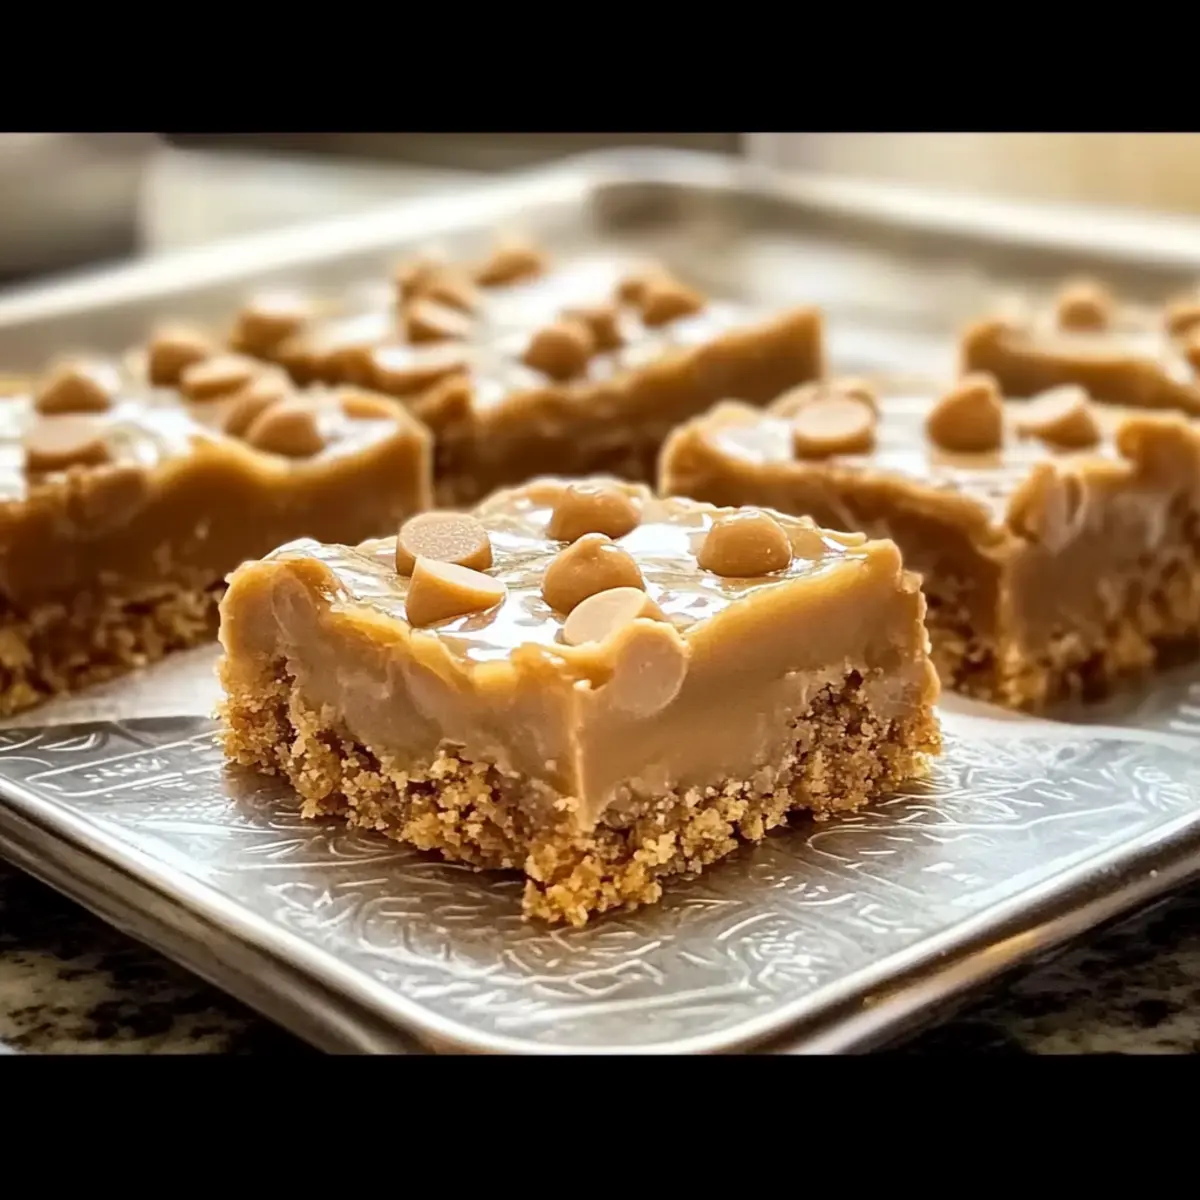
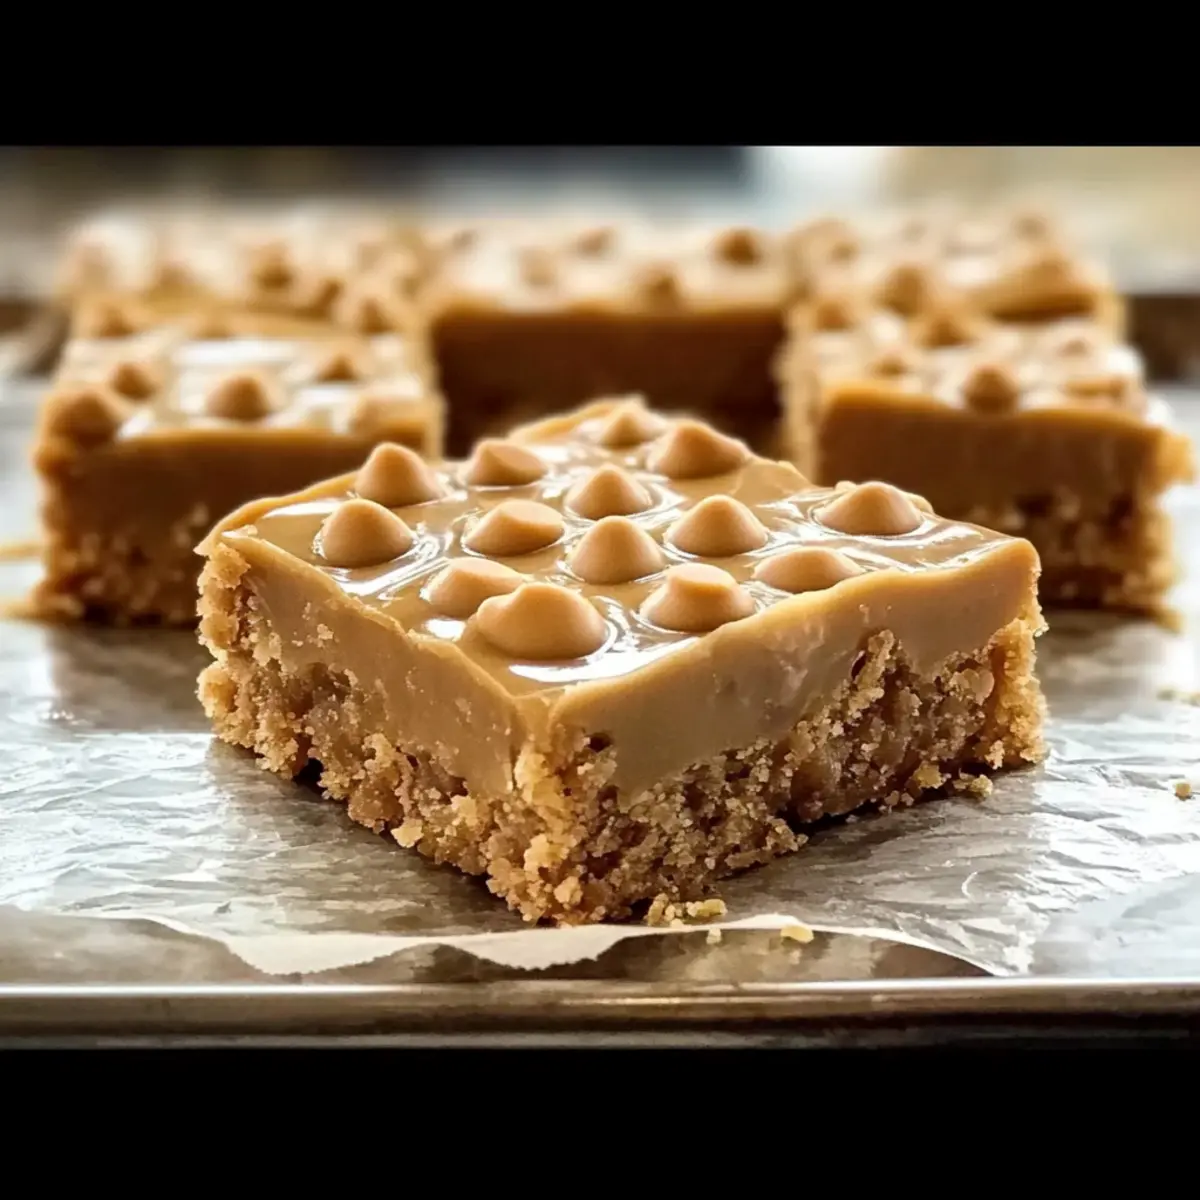
As I stood in my kitchen with the comforting scent of melting butterscotch wafting through the air, I felt a wave of nostalgia wash over me. There’s something truly magical about Trisha Yearwood’s Butterscotch Bars, a delightful blend of chewy texture and creamy peanut butter glaze that just beckons you to take a bite. If you’re looking for an easy baking recipe that not only satisfies your sweet tooth but also makes for a crowd-pleasing dessert, you’re in for a treat! These bars come together effortlessly and are perfect for family gatherings or cozy nights in, bringing joy to everyone who has a taste. Curious to learn how to whip up these delightful treats? Let’s dive in!
Why are These Butterscotch Bars Irresistible?
Decadent, Chewy Texture: Every bite of these Butterscotch Bars delivers a delightful chew that’s simply irresistible, thanks to the perfect blend of oatmeal and rich butterscotch.
Simplicity Meets Flavor: With straightforward steps, you can effortlessly create a delicious dessert that impresses; it’s the ideal recipe for both novice bakers and seasoned chefs.
Peanut Butter Glaze: The creamy peanut butter glaze isn’t just an afterthought; it elevates the bars into a decadent treat that’ll have everyone coming back for seconds.
Crowd-Pleasing Delight: Whether it’s a family gathering or a cozy night in, these bars are sure to disappear fast, just like my Pistachio Dream Bars do at parties!
Customization Options: Feeling adventurous? You can easily tweak the recipe by adding chocolate chips or nuts, making it a versatile dessert for any occasion.
Get ready to enchant your taste buds and impress your friends—these Butterscotch Bars are bound to become a favorite!
Butterscotch Bars Ingredients
Here’s everything you need to make these amazing Butterscotch Bars:
For the Bars
- Butter – Adds richness and moisture to the bars; use unsalted for more control over saltiness.
- Granulated Sugar – Provides sweetness and texture; substitute with coconut sugar for a less refined option.
- Light Brown Sugar – Contributes a hint of caramel flavor; however, dark brown sugar can add deeper notes.
- Creamy Peanut Butter – Enhances chewiness and nuttiness; natural options may change texture, so stir well before using.
- Egg – Binds the ingredients together; ensure it’s at room temperature for optimal integration.
- Vanilla Extract – Imparts wonderful aromatic flavor; opt for pure over imitation for best results.
- All-Purpose Flour – Builds structure; swap with a gluten-free blend for gluten-free bars.
- Baking Soda – A leavening agent that helps the bars rise; make sure it’s fresh for the best effect.
- Salt – Balances sweetness and elevates flavor.
- Quick-Cooking Oatmeal – Provides texture and chewiness; choose certified gluten-free oats for the gluten-free version.
- Butterscotch Chips – Adds a burst of sweetness; feel free to substitute with chocolate chips if you like!
For the Glaze
- Powdered Sugar – Sweetens and thickens the glaze for a smooth finish.
- Milk – Creates a pourable consistency; non-dairy options like almond milk work perfectly too!
Step‑by‑Step Instructions for Butterscotch Bars
Step 1: Preheat Your Oven
Begin by preheating your oven to 350°F (175°C). While the oven warms up, take a 9×13-inch baking dish and grease it generously with butter to ensure your Butterscotch Bars will come out easily after baking. This step is crucial for a perfect texture and appearance!
Step 2: Cream the Wet Ingredients
In a large mixing bowl, combine 1 cup of softened unsalted butter, ½ cup granulated sugar, and ½ cup light brown sugar. Using an electric mixer, beat the mixture on medium speed until it is light and fluffy, which should take about 2-3 minutes. Next, add in 1 room-temperature egg and 1 teaspoon of pure vanilla extract, mixing until smooth and fully incorporated.
Step 3: Mix the Dry Ingredients
In a separate bowl, sift together 2 cups of all-purpose flour, 1 teaspoon of baking soda, and ½ teaspoon of salt. Then, stir in 1 ½ cups of quick-cooking oatmeal until well combined. It’s important to make sure these dry ingredients are evenly mixed, as this will contribute to the overall texture of your Butterscotch Bars.
Step 4: Combine the Mixtures
Gradually add the dry ingredient mixture to the wet ingredients, stirring gently with a spatula until just combined. Aim for a thick batter; avoid overmixing, as it can lead to dense bars. Finally, fold in 1 cup of butterscotch chips, making sure they are distributed evenly throughout the batter for bursts of flavor in every bite.
Step 5: Assemble the Bars
Pour the batter into your prepared baking dish, spreading it evenly to reach the corners. Gently sprinkle some additional butterscotch chips on top of the batter, pressing them slightly into the surface. This will enhance the presentation of your Butterscotch Bars, ensuring they look as delightful as they taste.
Step 6: Bake the Bars
Place the baking dish in the preheated oven and bake for 20-25 minutes. You’ll know they’re ready when the edges are golden brown and a toothpick inserted in the center comes out with a few moist crumbs attached. Keep an eye on them towards the end to avoid overbaking!
Step 7: Prepare the Glaze
While the bars are baking, prepare the creamy peanut butter glaze. In a medium mixing bowl, whisk together 1 cup of powdered sugar, ¼ cup of milk, and ½ cup of creamy peanut butter. Mix until the glaze is smooth and pourable but not too runny; you want it to beautifully coat your Butterscotch Bars.
Step 8: Glaze the Bars
Once your Butterscotch Bars are out of the oven, immediately pour the peanut butter glaze over the warm bars. Use a spatula to spread it evenly across the surface, allowing it to soak in slightly while adding extra sweetness to every bite. This finishing touch really elevates the enjoyment of your treats!
Step 9: Cool and Serve
Allow your Butterscotch Bars to cool completely in the baking dish before cutting them into squares. This cooling time helps the bars set, making them easier to slice for a cleaner finish. Once cooled, serve them to your eager friends and family, and watch as they disappear quickly!
Expert Tips for Butterscotch Bars
-
Avoid Overmixing: Mixing too much can lead to dense bars; combine ingredients until just incorporated for a light, chewy texture.
-
Room Temperature Ingredients: Make sure your egg and butter are at room temperature to ensure smooth integration and enhance the overall flavor of your Butterscotch Bars.
-
Fresh Baking Soda: Always check the freshness of your baking soda; this little ingredient is key to helping your bars rise properly during baking.
-
Perfect Baking Time: Keep an eye on your bars as they bake; a toothpick should come out with a few moist crumbs, not completely clean, indicating a chewy texture.
-
Chill for Cleaner Slices: Refrigerate the cooled bars for 30 minutes before cutting to create perfect squares and prevent crumbling.
-
Storage Tips: Store your Butterscotch Bars in an airtight container at room temperature for up to five days, or freeze them to enjoy later!
What to Serve with Trisha Yearwood’s Butterscotch Bars
These delightful treats are perfect for creating a memorable meal filled with warmth and joy.
-
Vanilla Ice Cream: A scoop of creamy vanilla ice cream adds a delightful contrast to the chewiness of the bars, making every bite a little more indulgent. The cold and creamy texture beautifully balances the sweetness of the butterscotch.
-
Fresh Berries: A medley of fresh strawberries, raspberries, or blueberries gives a burst of tart flavor that cuts through the richness of the bars. This fresh element brings vibrancy to your dessert spread, inviting everyone to dig in!
-
Coffee or Espresso: An aromatic cup of coffee enhances the flavors of the butterscotch bars while providing a delightful pick-me-up. The warmth of the drink complements the chewy texture, making it the perfect afternoon treat.
-
Chocolate Drizzle: A simple melt of dark chocolate drizzled on top of the bars amplifies their sweetness. The bittersweet notes of chocolate pair wonderfully with butterscotch, creating an elegant presentation that’s sure to impress.
-
Whipped Cream: A dollop of freshly whipped cream adds a light and airy texture, enhancing the overall dessert experience. It’s a classic touch that makes the treat feel extra special.
-
Nutty Trail Mix: A small side of nutty trail mix offers a crunchy texture and a bit of saltiness, balancing out the sweetness of the bars perfectly. The combination of flavors makes for a delightful snack while enjoying the dessert.
-
Milkshake: A rich, creamy milkshake is a fun twist that turns your dessert into a full indulgent experience. Blending in some butterscotch flavoring will tie it back to your bars, creating a deliciously nostalgic pairing.
Butterscotch Bars Variations & Substitutions
Feel free to get creative with your Butterscotch Bars; these delightful tweaks can take your treats to new heights!
- Chocolatey Delight: Add 1/2 cup chocolate chips for a rich twist that pairs perfectly with the butterscotch flavor. Imagine the melty goodness!
- Nutty Crunch: Stir in 1/2 cup of chopped nuts, such as walnuts or pecans, to add delightful crunch and depth to each chewy bite. The extra texture complements the softness beautifully!
- Decadent Caramel Drizzle: Drizzle warm caramel sauce over the finished glaze for an indulgent treat that’s sure to satisfy any sweet craving. It’s a luxurious finish that makes these bars even more irresistible.
- Festive Sprinkles: Incorporate colorful sprinkles into the batter for a fun touch, especially during holidays or birthdays. This not only adds flair but also makes for a delightful surprise in every bite.
- Coconut Flake Twist: Mix in 1/2 cup of sweetened shredded coconut for a tropical twist that adds both flavor and texture. The coconut complements the butterscotch beautifully!
- Spicy Heat: For a warm kick, add a pinch of cayenne pepper or cinnamon into the batter to spice things up. Embrace the hint of heat against the sweetness.
- Gluten-Free Option: Swap all-purpose flour for a gluten-free blend and use certified gluten-free oats to create a delicious treat suitable for everyone. You won’t sacrifice any flavor or texture!
- Peanut Butter Lovers: Double the peanut butter in both the bars and glaze for an extra nutty flavor that will make all peanut butter aficionados fall in love! In fact, sneak a slice alongside my delectable Pistachio Dream Bars for an unforgettable treat pairing.
There’s no limit to how you can personalize these Butterscotch Bars to make them your own!
How to Store and Freeze Butterscotch Bars
- Room Temperature: Store your cooled Butterscotch Bars in an airtight container at room temperature for up to 5 days. This will keep them soft and chewy for your enjoyment.
- Fridge: If you prefer a firmer texture, place the bars in the fridge. They can last for up to a week while retaining their delicious flavor!
- Freezer: For longer storage, wrap individual bars tightly in plastic wrap and place them in a freezer-safe bag. They will maintain quality for up to 3 months.
- Reheating: To enjoy frozen Butterscotch Bars, allow them to thaw in the refrigerator overnight, or heat them in the microwave for about 10-15 seconds for that fresh-out-of-the-oven taste!
Make Ahead Options
These Butterscotch Bars are perfect for meal prep enthusiasts looking to save time during busy weeks! You can prepare the batter and refrigerate it for up to 24 hours before baking, which helps the flavors meld beautifully. Simply mix the wet and dry ingredients, combine, and store the batter tightly covered in the fridge. When you’re ready to bake, pour it into the prepared pan and sprinkle with butterscotch chips before placing it in the oven. Remember, for best results, bake them fresh for that chewy texture while maintaining quality. After cooling, feel free to glaze and enjoy these delightful Butterscotch Bars whenever the craving strikes!

Trisha Yearwood’s Chewy Butterscotch Bars Recipe FAQs
What kind of butterscotch chips should I use?
I recommend using high-quality butterscotch chips for the best flavor. Brands like Nestlé or Ghirardelli provide a rich sweetness that pairs perfectly with the bars. If you’d like to mix it up, semi-sweet chocolate chips can make for a delightful substitution!
How can I tell if my oatmeal is gluten-free?
To ensure your oatmeal is gluten-free, look for certified gluten-free labels when purchasing. Some oats are processed in facilities that also handle gluten-containing grains, potentially leading to cross-contamination. Always check packaging for guarantees if gluten-free is essential for your diet!
How do I store leftover butterscotch bars?
For optimal freshness, store your cooled butterscotch bars in an airtight container at room temperature for up to 5 days. If you’d like them to last longer, refrigerating them will extend their shelf life to about a week while maintaining that delicious flavor. Just be aware that chilling may firm up the bars slightly.
Can I freeze butterscotch bars?
Absolutely! Wrap individual butterscotch bars tightly in plastic wrap and place them in a freezer-safe bag to maintain their freshness. They can be frozen for up to 3 months. When you’re ready to enjoy them, thaw overnight in the refrigerator or pop them in the microwave for about 10-15 seconds to warm them up.
What should I do if my bars are too dry?
If your butterscotch bars come out dry, it might be due to overbaking. Always check them a few minutes before the suggested baking time and remove them once the edges are golden but the center remains a bit gooey. If it happens, serving them warm with a scoop of ice cream or a drizzle more glaze can help restore the moistness!

Chewy Butterscotch Bars with Creamy Peanut Butter Glaze
Ingredients
Equipment
Method
- Preheat your oven to 350°F (175°C) and grease a 9x13-inch baking dish with butter.
- In a large mixing bowl, cream together the butter, granulated sugar, and light brown sugar until light and fluffy. Add egg and vanilla extract, mixing until smooth.
- Sift together the flour, baking soda, and salt. Stir in the oats until combined.
- Gradually add the dry ingredients to the wet mixture, then fold in the butterscotch chips.
- Pour the batter into the prepared baking dish and sprinkle additional butterscotch chips on top.
- Bake for 20-25 minutes, until the edges are golden and a toothpick comes out with a few moist crumbs.
- While the bars bake, prepare the glaze by whisking together powdered sugar, milk, and peanut butter until smooth.
- Pour the glaze over the warm bars and spread evenly.
- Cool completely, then cut into squares and serve.
Leave a Reply