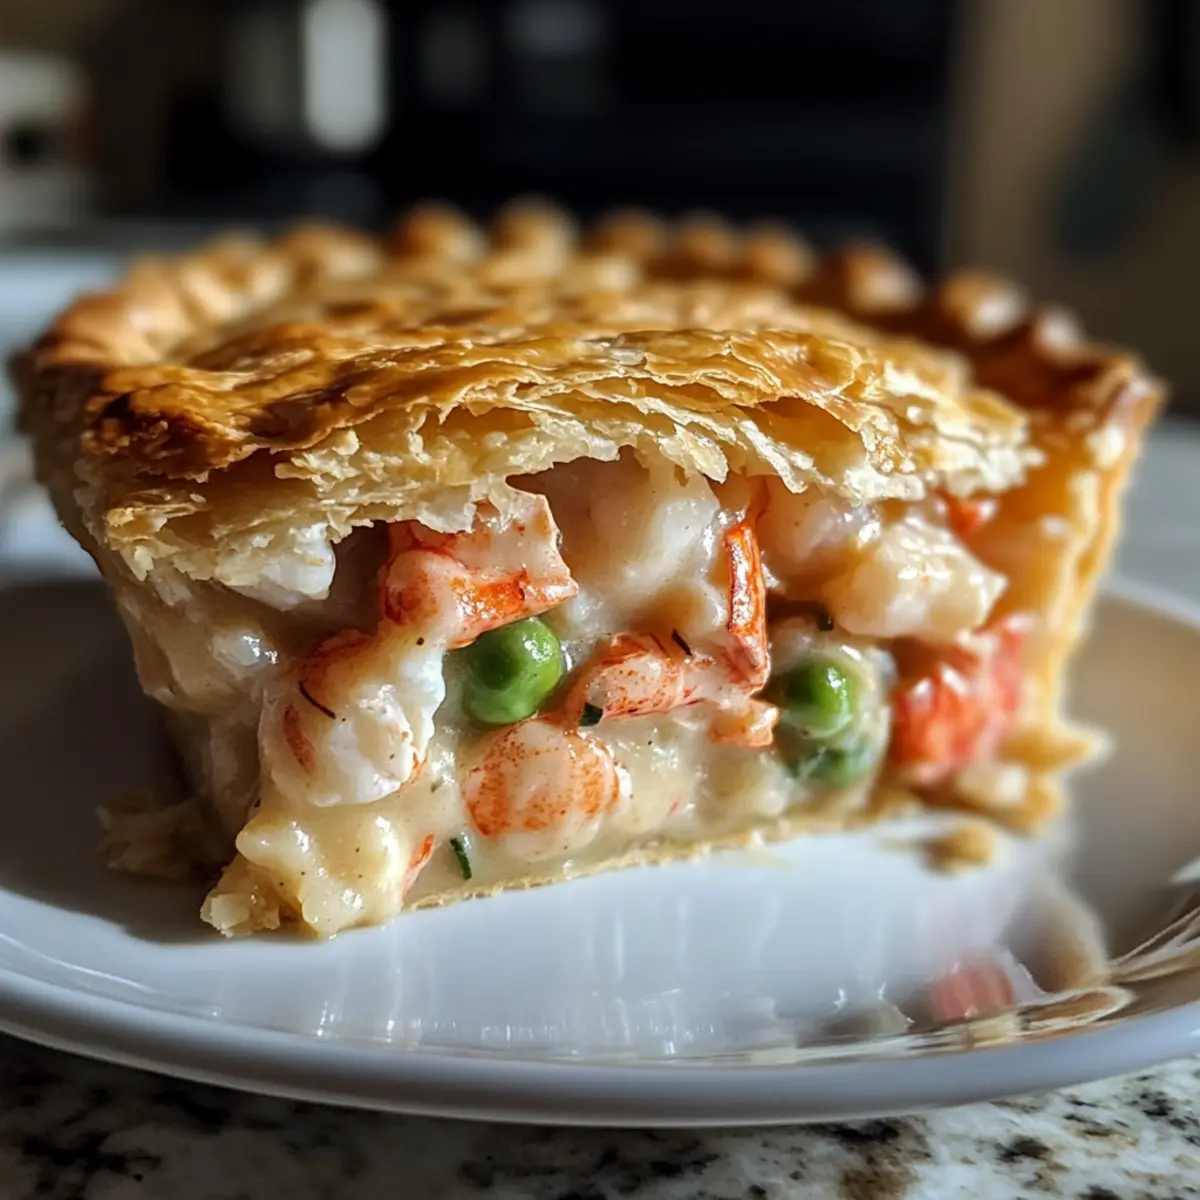
The aroma of a warm, buttery pie baking fills my kitchen, and suddenly, I’m transported to the quaint seaside shacks of New England where every bite feels like a comforting hug. Today, we’re diving into the Ultimate Lobster Pot Pie, a dish that captures the essence of coastal indulgence with its creamy filling of tender lobster meat nestled among vibrant veggies, all wrapped in a flaky crust. What I love most about this recipe is its adaptability; it’s just as delightful with succulent shrimp or your favorite seafood variation, making it the perfect crowd-pleaser for cozy nights in or festive gatherings. Plus, it’s make-ahead friendly—prepare it before your guests arrive, and let the oven do the work! Ready to uncover the secrets behind this comforting delight? Let’s get started!
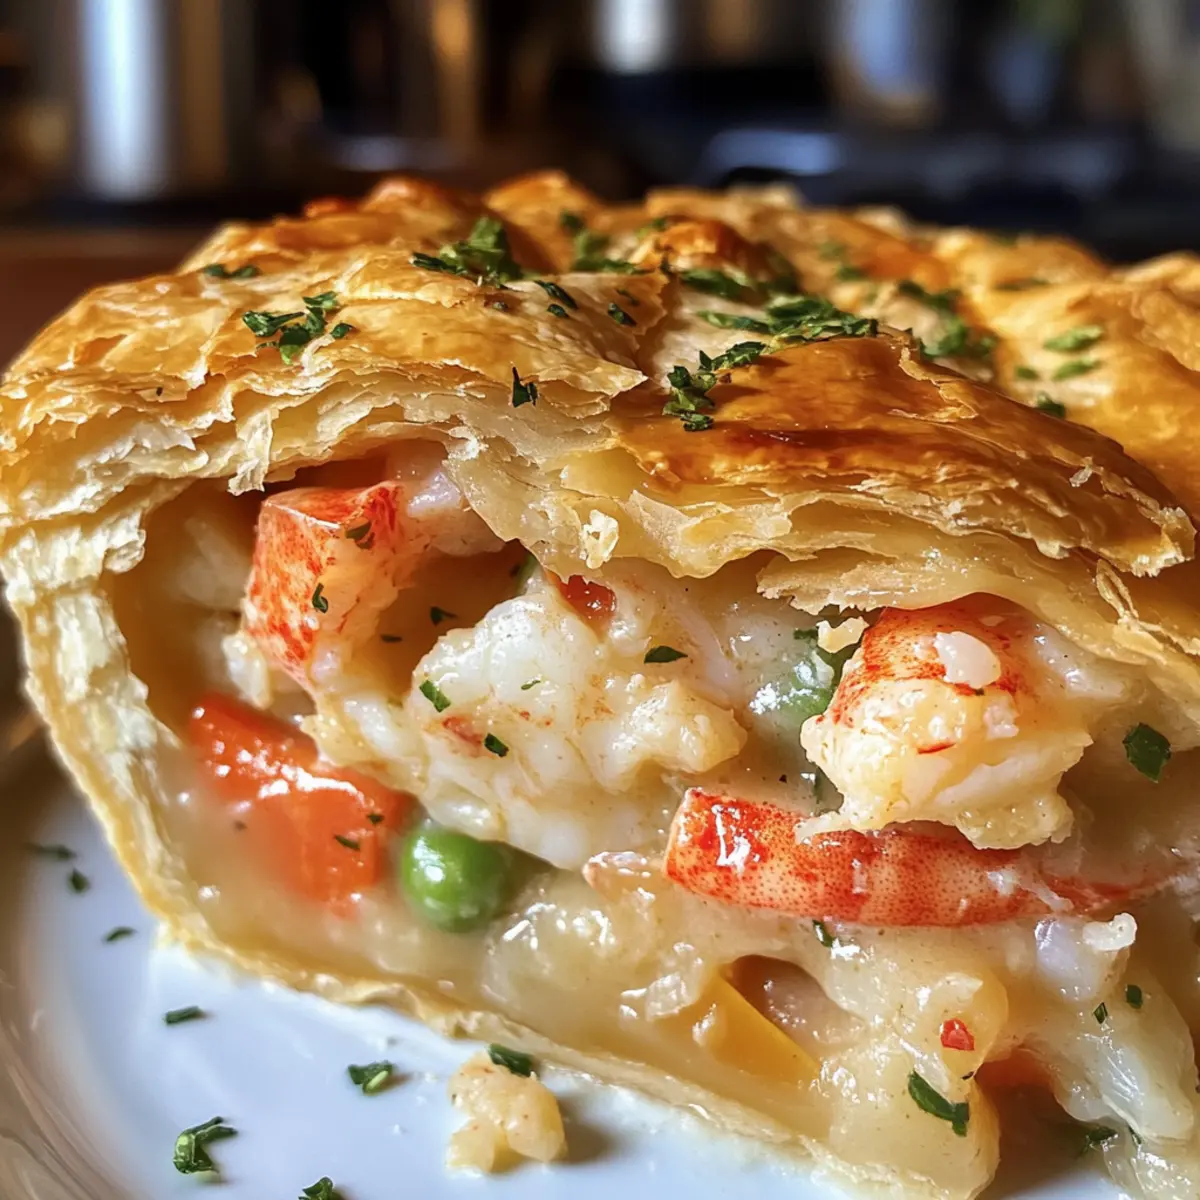
Why Is Lobster Pot Pie So Special?
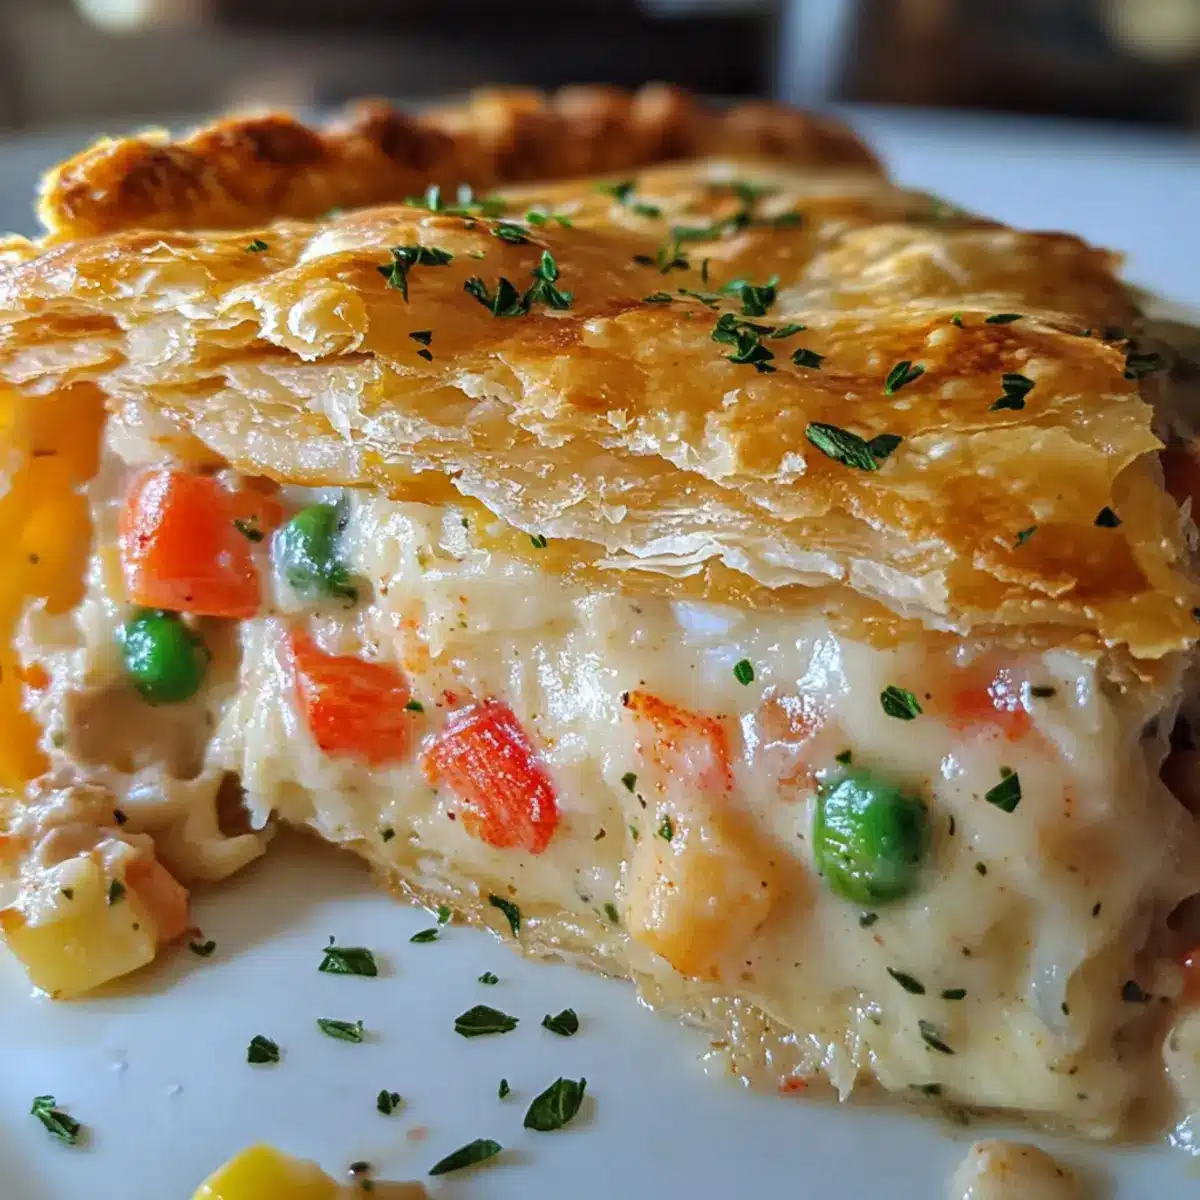
Comforting, Rich Flavors: The melding of creamy lobster filling with sautéed vegetables creates a taste that warms the soul.
Versatility at Its Best: Easily adapt this recipe by swapping lobster with shrimp or your favorite seafood, catering to all preferences.
Effortless Make-Ahead: Perfect for entertaining, prepare this pot pie in advance and allow the oven to deliver a stunning dish with minimal effort.
Impressive Appearance: The golden-brown crust invites you to dig in, making it an impressive centerpiece at any gathering.
Total Crowd-Pleaser: This dish’s combination of flavors and textures makes it a hit with family and friends, ensuring happy faces around the table—similar to what you’d experience with a delicious Garlic Butter Lobster or a hearty Seafood Lasagna Lobster.
With all these delightful features, you’ll love making and sharing this incredible Lobster Pot Pie!
Lobster Pot Pie Ingredients
Here’s everything you need to create this delicious Lobster Pot Pie.
For the Filling
- Lobster Meat – Fresh, cooked lobster offers the best flavor; use thawed frozen if fresh isn’t available.
- Heavy Cream – Creates a rich and velvety filling that adds depth to your dish.
- Chicken or Seafood Stock – Essential for adding a savory backbone to the creamy mixture.
- Onion – A sweet, aromatic base; make sure to dice for even cooking.
- Garlic – Minced garlic enhances the overall flavor profile beautifully.
- Carrots – Diced, they bring sweetness and vibrant color to the filling.
- Celery – Adds crunch and additional flavor; diced to match the size of other ingredients.
- Frozen Peas – No prep needed; their sweetness is a wonderful compliment to the seafood.
- Fresh Thyme – A lovely earthy touch; double the amount for a stronger flavor.
- Lemon Juice – Brightens the dish; fresh is best, but bottled works too.
- Salt – A must for balancing and enhancing all flavors.
- Black Pepper – Introduces subtle heat that accentuates the filling.
- Olive Oil – For sautéing the vegetables and adding richness to the dish.
For the Crust
- Pre-made Pie Crusts – Saves time while still achieving that irresistible flaky texture; homemade is an option if you prefer.
- Egg (Beaten) – Brush this over the crust for a beautiful golden finish when baked.
With these fresh ingredients, your Lobster Pot Pie will be a delightful comfort food experience that warms the heart and dazzles the palate!
Step‑by‑Step Instructions for Lobster Pot Pie
Step 1: Preheat the Oven
Begin by preheating your oven to 400°F (204°C). This step is crucial as it ensures that your Lobster Pot Pie will bake evenly and develop that golden-brown crust we all adore. While the oven heats, gather your ingredients and prepare to bring your kitchen to life with comforting aromas.
Step 2: Sauté Aromatics
In a large skillet, heat 2 tablespoons of olive oil over medium heat. Add diced onions and minced garlic, sautéing them for about 4-5 minutes until they turn translucent and fragrant. This forms a flavorful base for your filling, ensuring every bite of your Lobster Pot Pie will be rich and delicious.
Step 3: Add Vegetables
Once the onions and garlic are ready, toss in the diced carrots and celery. Continue to sauté the mixture for another 5 minutes until the vegetables soften. Their natural sweetness enhances the filling, adding a vibrant crunch that pairs beautifully with the tender lobster you’ll soon incorporate.
Step 4: Create the Creamy Filling
Pour in 1 cup of heavy cream and 1 cup of chicken or seafood stock, stirring well to combine. Bring this mixture to a simmer, allowing it to thicken slightly—about 5-7 minutes. You’ll know it’s ready when the sauce coats the back of a spoon, creating a luscious base for your Lobster Pot Pie.
Step 5: Fold in Lobster and Peas
Gently fold in the cooked lobster meat and frozen peas, stirring continuously for about 5 minutes. This ensures that every piece of lobster is well-coated with the creamy filling, while the peas contribute pops of sweetness that elevate the overall dish.
Step 6: Season the Filling
Once the filling has thickened and everything is combined, remove the skillet from heat and stir in fresh thyme, lemon juice, salt, and black pepper. Tasting as you go ensures that the flavors develop beautifully, making your Lobster Pot Pie truly irresistible.
Step 7: Prepare the Pie Crust
Roll out one of your pre-made pie crusts into a 9-inch pie dish, ensuring it fits snugly. Pour the creamy lobster filling into the crust, spreading it evenly with a spatula. This step sets the foundation for a delightful pot pie, ready to be topped with a flaky layer of crust.
Step 8: Assemble the Pie
Cover the filling with the second pie crust, crimping the edges to seal in the delicious filling. Cut a few slits in the top crust to allow steam to escape during baking; these will add a rustic charm to your Lobster Pot Pie while preventing it from becoming soggy.
Step 9: Brush with Egg Wash
Using a beaten egg, brush the top of your pie crust to achieve a beautiful golden finish while baking. This simple step not only enhances the visual appeal but also adds a luscious richness that complements the crust perfectly.
Step 10: Bake the Pot Pie
Place the assembled Lobster Pot Pie in your preheated oven and bake for 30-35 minutes, or until the crust is golden brown and the filling is bubbling. Keep an eye on it during the last few minutes—this is when the magic happens, and you want that perfect crust.
Step 11: Rest Before Serving
Once baked, remove the Lobster Pot Pie from the oven and let it rest for 10-15 minutes. This cooling period allows the filling to set slightly, making each slice a delightful experience as you serve it warm to your loved ones.
Expert Tips for Lobster Pot Pie
-
Pre-Bake Bottom Crust: To avoid a soggy bottom, pre-bake the bottom pie crust for 5-7 minutes before adding your filling.
-
Thicker Filling: Allow the creamy filling to simmer until it thickens enough to coat the back of a spoon; this prevents a runny Lobster Pot Pie.
-
Flavor Variations: Don’t hesitate to swap out lobster with shrimp or a mix of seafood for a delicious twist that suits your guests’ tastes.
-
Make-Ahead Joy: You can prepare the Lobster Pot Pie up to 24 hours in advance. Simply refrigerate it unbaked, then bake it straight from the fridge!
-
Herb Power: Enhance the flavor further by adding fresh herbs like dill or parsley; they elevate the freshness and make a delightful difference.
How to Store and Freeze Lobster Pot Pie
Fridge: Store your leftover Lobster Pot Pie in an airtight container for up to 3 days to retain its delicious flavors and creamy texture.
Freezer: If you want to save it for a rainy day, wrap the unbaked pie tightly in plastic wrap and freeze it for up to 3 months.
Reheating: To enjoy your Lobster Pot Pie again, reheat it in the oven at 350°F (175°C) until warmed through, about 30-35 minutes.
Make-Ahead: Feel free to prepare the filling a day in advance and store it in the fridge; assemble and bake when you’re ready for a comforting meal.
What to Serve with Lobster Pot Pie
Transform your Lobster Pot Pie into an unforgettable culinary experience with delightful side dishes and drinks.
- Crispy Green Salad: A refreshing salad balances the richness of the pie, with a light vinaigrette enhancing each bite.
- Warm Garlic Bread: Perfect for sopping up any delicious filling that escapes. The aroma alone makes it irresistible!
- Roasted Asparagus: Tender, slightly charred, and drizzled with lemon, asparagus brings brightness and a satisfying crunch to the table.
- Chilled Chardonnay: This wine’s crispness complements the creamy lobster filling, making every sip a delightful addition to your meal.
- Mashed Potatoes: Buttery and smooth, these creamy potatoes add comfort while enhancing the lobster’s flavors.
- Tangy Lemon Tart: Round off the meal with a sweet and zesty lemon tart that cleanses the palate after a hearty dinner.
- Fried Zucchini Sticks: Crispy and delectable, they add a fun, crunchy texture that contrasts beautifully with the creamy pie.
- Herbed Couscous: Light and fluffy, couscous with fresh herbs offers a fragrant base to enjoy alongside the rich lobster pot pie.
- Grilled Corn on the Cob: Sweet and smoky, grilled corn adds a summery touch that resonates well with the flavors of the sea.
Lobster Pot Pie Variations & Substitutions
Feel free to let your culinary creativity shine as you customize this comforting dish with these delightful variations.
-
Seafood Swap: Substitute lobster with shrimp or a mix of your favorite seafood for a new twist.
-
Dairy-Free Delight: For a lighter option, replace heavy cream with unsweetened coconut milk to keep it creamy and rich.
-
Veggie Boost: Add seasonal vegetables like sautéed leeks or zucchini to enhance the filling’s texture and flavor.
-
Herb Infusion: Incorporate fresh herbs such as dill, parsley, or chives for an added layer of freshness that elevates the dish.
-
Heat It Up: Sprinkle in some red pepper flakes or sriracha for a spicy kick that perfectly complements the creamy filling.
-
Crunchy Top: For a delightful texture twist, sprinkle panko breadcrumbs over the top before baking for extra crunch.
-
Flavorful Stock: Swap chicken stock with seafood stock to deepen the savory notes of the filling, making each bite even more irresistible.
Craving a seafood-based dish with a twist? Don’t miss out on trying a comforting Autumn Vegetable Pot as well!
Make Ahead Options
Preparing your Lobster Pot Pie ahead of time is a fantastic way to save precious minutes on busy weeknights! You can assemble the unbaked pie and refrigerate it for up to 24 hours; simply cover it tightly with plastic wrap to maintain its freshness and prevent the crust from drying out. If you want to make it even further in advance, freeze the assembled pie for up to three months—just remember to wrap it with heavy-duty foil or freezer paper for optimal quality. When you’re ready to enjoy, bake it straight from the fridge or freezer; just increase the baking time by about 10-15 minutes if baking from frozen. Enjoy the convenience of having this comforting dish prepared and ready to serve!
Lobster Pot Pie Recipe FAQs
What type of lobster should I use for the filling?
Absolutely! Fresh, cooked lobster provides the best flavor and texture for your Lobster Pot Pie. If fresh lobster isn’t available, thawed frozen lobster is an excellent alternative. Look for lobster meat that is firm and has a light, sweet aroma—this ensures you’re getting the freshest quality for your dish.
How should I store leftovers?
Your leftover Lobster Pot Pie can be stored in an airtight container in the refrigerator for up to 3 days. Just make sure to cover it securely to keep that delicious creamy texture intact. When you’re ready to enjoy it again, a quick reheat in the oven brings back that cozy feel.
Can I freeze Lobster Pot Pie?
Yes! To freeze your Lobster Pot Pie, wrap the unbaked pie tightly in plastic wrap and then place it in a freezer-safe container. It can be frozen for up to 3 months. When you’re ready to bake it, you can take it directly from the freezer to the oven, but just be sure to adjust the baking time accordingly!
What if my filling turns out runny?
If your filling is runny, it might not have thickened enough during cooking. Make sure to let the cream and stock simmer until it coats the back of a spoon before folding in the lobster and peas. If it does happen, you can add a cornstarch slurry (1 tablespoon cornstarch mixed with 1 tablespoon of water) to help thicken it up. Just remember to reheat gently!
Can I customize this recipe for dietary restrictions?
Very! You can easily substitute the lobster for shrimp or a mix of your favorite seafood. For a dairy-free option, replace the heavy cream with unsweetened coconut milk—it’s a fantastic way to maintain a creamy texture without any dairy. Additionally, always check for any allergies associated with seafood and make sure your guests feel included with safe options.
How long can I keep the unbaked pie in the fridge?
I often prepare the Lobster Pot Pie a day in advance. You can wrap the unbaked pie tightly and store it in the refrigerator for up to 24 hours. This way, you can save time on the day of serving and still enjoy a freshly baked meal. Just pop it in the oven straight from the fridge; you may need to add a few extra minutes to the baking time!

Irresistible Lobster Pot Pie: Comfort Food at Its Best
Ingredients
Equipment
Method
- Preheat your oven to 400°F (204°C).
- In a large skillet, heat 2 tablespoons of olive oil over medium heat. Add diced onions and minced garlic, sautéing for about 4-5 minutes until they are translucent and fragrant.
- Toss in diced carrots and celery, and continue to sauté for another 5 minutes until the vegetables soften.
- Pour in 1 cup of heavy cream and 1 cup of chicken or seafood stock, stirring well. Bring to a simmer and cook for about 5-7 minutes until thickened.
- Gently fold in the cooked lobster meat and frozen peas, stirring continuously for about 5 minutes.
- Remove from heat and stir in fresh thyme, lemon juice, salt, and black pepper.
- Roll out one pre-made pie crust into a 9-inch pie dish. Pour the creamy lobster filling into the crust.
- Cover with the second pie crust, crimp the edges, and cut slits in the top crust.
- Brush the top with a beaten egg for a golden finish.
- Bake for 30-35 minutes until golden brown and bubbling.
- Let it rest for 10-15 minutes before serving.
Leave a Reply