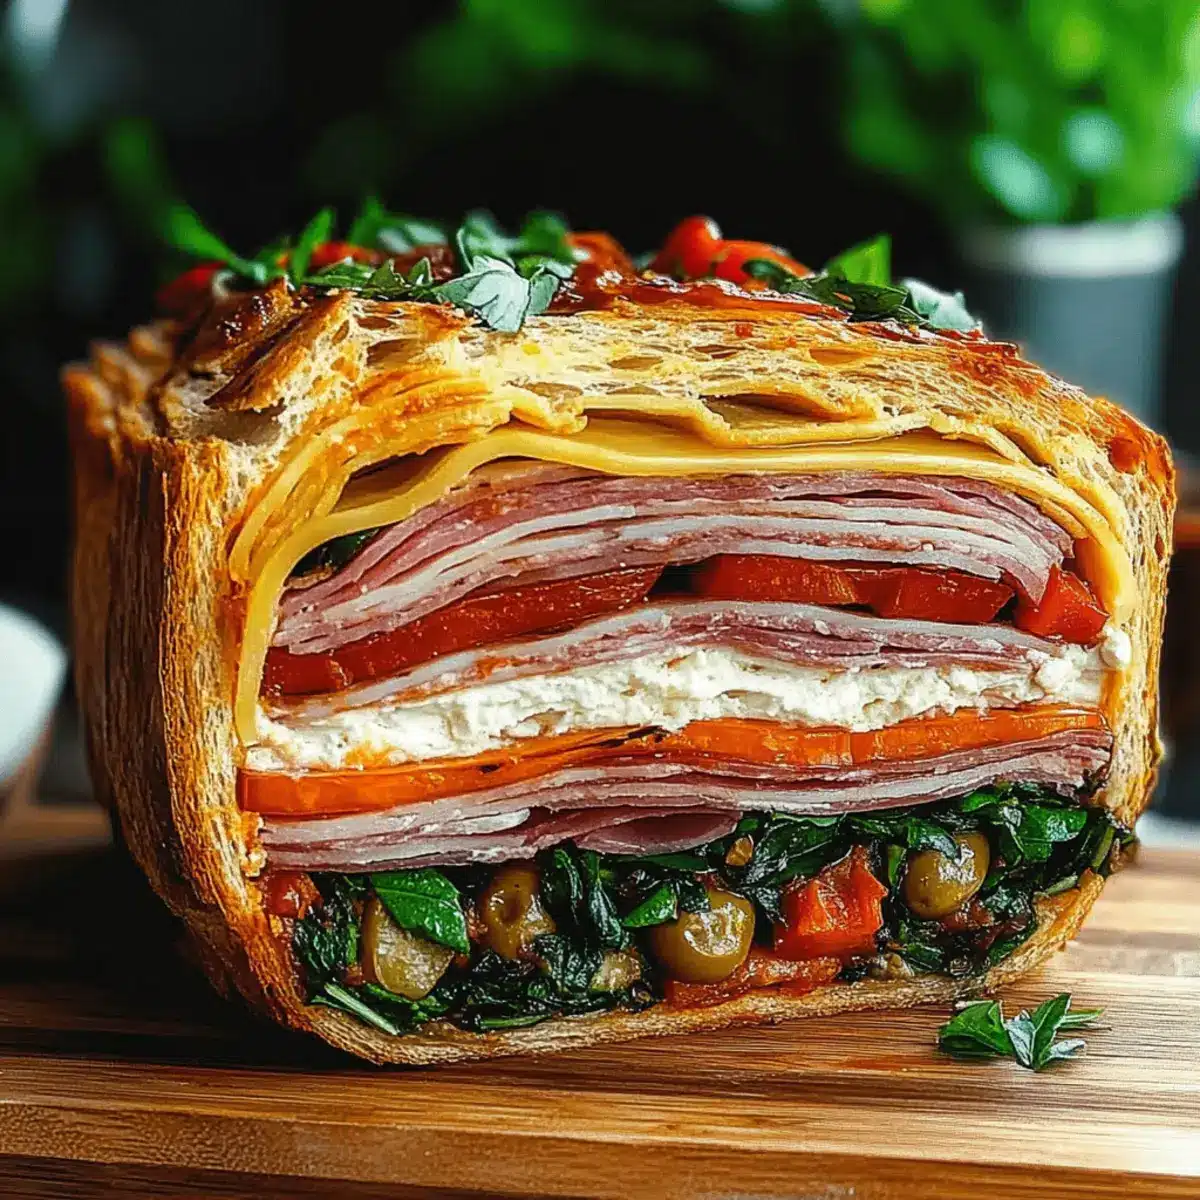
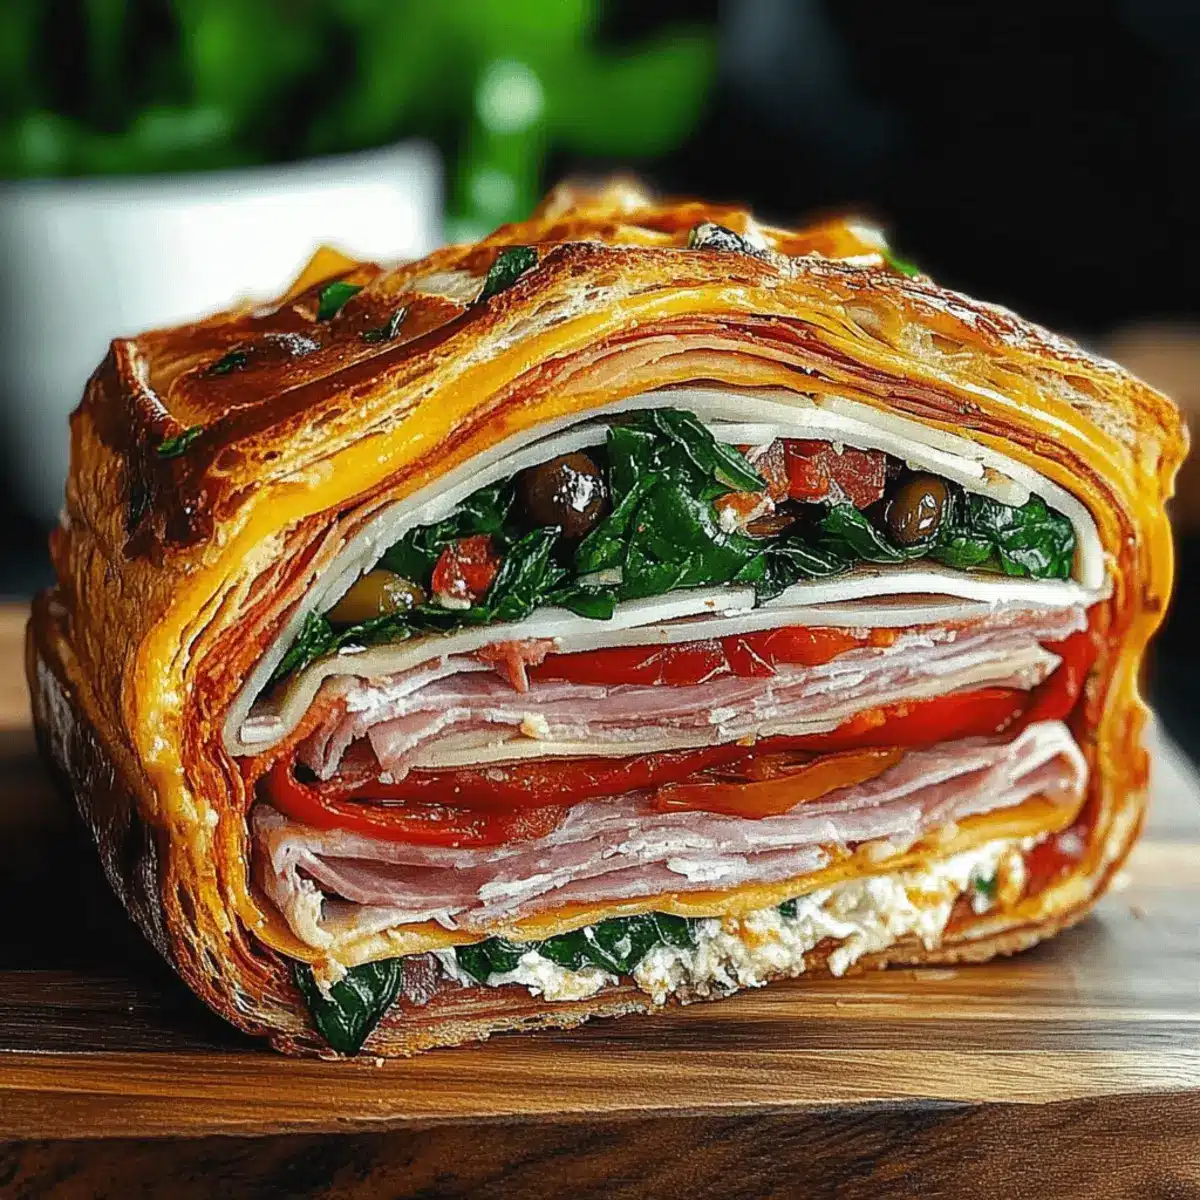
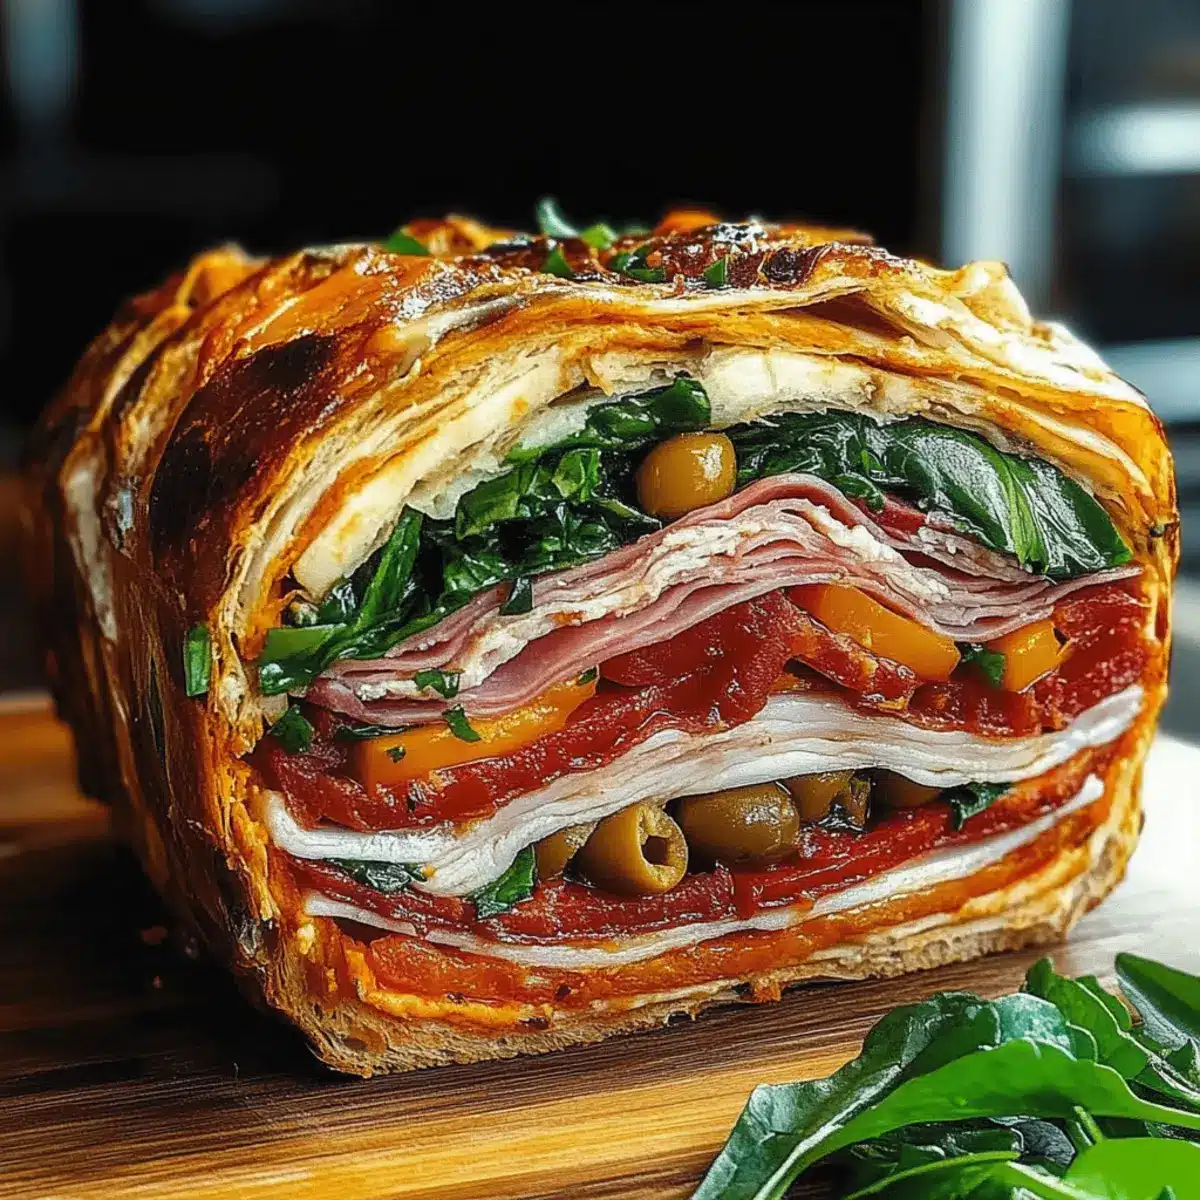
Strolling through a bustling Italian market, I stumbled upon a beautifully assembled sandwich that stopped me in my tracks: the Pressed Italian Picnic Sandwich Loaf. Layers of savory meats, tangy cheeses, and vibrant roasted peppers danced before my eyes, promising a flavor experience I couldn’t resist. This incredible sandwich isn’t just a feast for the senses; it’s a masterpiece of meal prep that holds together magnificently, making it the ideal companion for picnics or gatherings. With its effortless customization options, from vegetarian delights to spicy surprises, this Italian Picnic Sandwich Loaf ensures that every palette is catered for. Ready to dive into a slice of sandwich bliss? Let’s create something unforgettable together!
Why is this sandwich a must-try?
Flavor Explosion: Each bite of the Pressed Italian Picnic Sandwich Loaf delivers a delightful crunch followed by layers of savory meats and zesty cheeses. Endless Customization: With options for vegetarian, spicy, breakfast, or low-carb variations, there’s a perfect option for everyone. Travel-Friendly: This sandwich holds its shape beautifully, making it an ideal choice for picnics or gatherings. Time-Saving Preparation: Make it ahead, and let it marinate overnight for a robust flavor experience. Consider pairing it with light sides like olives or fresh grapes for a full feast!
Italian Picnic Sandwich Loaf Ingredients
• Get ready to gather the goodness!
For the Bread Base
- Loaf of Bread – Opt for sturdy varieties like ciabatta or focaccia to prevent sogginess.
For the Flavor Layer
- Olive Tapenade – This adds a punch of flavor and serves as a moisture barrier; feel free to swap with pesto or hummus.
- Salami – Offers savory depth and helps keep the other ingredients dry.
- Ham – A delicious flavor layer; you can easily replace it with turkey or rotisserie chicken.
For the Veggie Crunch
- Roasted Peppers – Sweet and juicy; you can use fresh veggies but remember to manage their moisture.
- Fresh Spinach – Adds color and a slight bitterness; alternatively, swap it with arugula or kale.
For the Creamy Gooeyness
- Cheese (e.g., provolone, mozzarella) – Choose your favorite melting cheese to take the flavor up a notch.
Embrace the wonderful combination of tastes and textures in this Italian Picnic Sandwich Loaf, making it a perfect option for your next outdoor feast!
Step‑by‑Step Instructions for Italian Picnic Sandwich Loaf
Step 1: Carve the Shell
Begin by slicing off the top of your loaf of sturdy bread, like ciabatta or focaccia. Carefully hollow out the insides, leaving about a 1-inch thick shell all around. This will create a solid base for your Italian Picnic Sandwich Loaf, ensuring that the bread holds up against the delicious fillings while preventing sogginess.
Step 2: Apply Tapenade
Spread a generous layer of olive tapenade on the inside of both the base and the lid of your hollowed loaf. This flavorful layer not only enhances the sandwich’s taste but also serves as a moisture barrier, keeping the bread crisp. Make sure to cover every nook and cranny for maximum flavor in each bite of the Italian Picnic Sandwich Loaf.
Step 3: Layer Ingredients
Starting with salami, layer your ingredients inside the loaf, slightly overlapping each piece for stability. Follow with ham, roasted peppers, fresh spinach, and your choice of cheese. Repeat the layers, building height and flavor until your loaf is packed tight. Each layer should be vibrant and enticing, creating that beautiful mosaic effect characteristic of your Italian Picnic Sandwich Loaf.
Step 4: Press the Sandwich
Once you’ve layered your ingredients, place the lid back on top of the loaf and securely wrap it in plastic wrap followed by aluminum foil. To allow the flavors to meld beautifully, weigh the sandwich down with a heavy object, like a cast-iron skillet, and refrigerate it for at least 8 hours, ideally overnight for the best results.
Step 5: Slice and Serve
After chilling, unwrap your Italian Picnic Sandwich Loaf from the fridge, and carefully remove any weights. Using a sharp knife, slice the sandwich into manageable portions. Enjoy the beautifully compressed, colorful layers as you serve this delightful meal at your next gathering or picnic, sharing the incredible flavors with friends and family.

Italian Picnic Sandwich Loaf Variations
Ready to personalize your Italian Picnic Sandwich Loaf and make it uniquely yours? Let’s get creative with these delightful twists!
-
Mediterranean Veggie: Swap out meats for grilled eggplant, zucchini, roasted red peppers, and a generous layer of hummus. This vibrant mix offers a freshness that perfectly complements the richness of cheese.
-
Spicy Devil: Incorporate hot capicola, spicy salami, and pepper jack cheese with a spread of chili-garlic for a fiery kick. This variation is perfect for those who like some heat in their meals!
-
Breakfast Loaf: Layer in scrambled eggs, crispy bacon, cheddar cheese, and hash browns for a morning delight. Who says sandwiches can’t be breakfast? This twist is sure to please any brunch crowd.
-
Seafood Star: Use tuna salad mixed with dill Havarti and capers for a refreshing seafood option. It combines a burst of ocean flavors that pairs wonderfully with the hearty bread.
-
Low-Carb Hack: Hollow out bell peppers and fill them with your favorite sandwich ingredients, creating a colorful low-carb alternative. They bring the same great flavors but with a lighter profile!
-
Cheesy Bliss: Go wild with a medley of cheeses like gorgonzola, brie, and mozzarella for a gooey experience. Layer different textures to elevate the overall taste and richness.
-
Pesto Delight: Spread basil pesto instead of olive tapenade and complement with sliced turkey and provolone. The vibrant flavors of fresh basil create a delightful twist that feels like summer.
Feeling inspired? This masterpiece allows for endless possibilities, just like those delightful Italian Almond Cookies that can be tailored to fit any sweet tooth! Explore the creative nature of your Italian Picnic Sandwich Loaf, and make it your own today!
How to Store and Freeze Italian Picnic Sandwich Loaf
Fridge: Keep your Italian Picnic Sandwich Loaf wrapped tightly in plastic and foil; it will stay fresh for up to 3 days. The flavors meld beautifully over time.
Freezer: For longer storage, slice the sandwich before freezing. Wrap each slice individually and store in an airtight container for up to 2 months. Thaw in the fridge before enjoying.
Reheating: If desired, reheat slices in a toaster oven for a crispy finish while warming the cheese and ingredients, maintaining its delicious flavor.
Make-Ahead: This sandwich can be prepared a day in advance; it can be made the morning before a picnic to enhance the taste and convenience for your outdoor feasts.
Expert Tips for Italian Picnic Sandwich Loaf
-
Layer Strategically: Always place meats at the bottom to create a protective barrier against moisture, ensuring your bread stays crisp in the Italian Picnic Sandwich Loaf.
-
Pressing Matters: Allow the sandwich to press overnight for optimal melding of flavors. Rushing this step may result in a less flavorful sandwich.
-
Moisture Management: Use drier ingredients to prevent sogginess. Consider blotting fresh veggies like peppers or spinach before layering.
-
Customize Freely: Don’t hesitate to experiment! Whether you choose spicy, vegetarian, or breakfast variations, each will bring its own delight to the Italian Picnic Sandwich Loaf.
-
Serving Tips: Slice and serve with a side of olives or fresh grapes to balance the richness and take your picnic to the next level.
What to Serve with Pressed Italian Picnic Sandwich Loaf
With its myriad layers of flavor and texture, this delightful sandwich serves as a centerpiece that invites the addition of complementary sides and drinks.
-
Light Salad: A fresh arugula salad with a lemon vinaigrette brightens up the meal, contrasting the richness of the sandwich.
-
Olives: A variety of marinated olives provide a briny bite, balancing the savory elements of the Pressed Italian Picnic Sandwich Loaf.
-
Fresh Grapes: Juicy, sweet grapes offer a refreshing contrast and can cleanse the palate between bites of the flavorful sandwich.
-
Pasta Salad: A chilled pasta salad with cherry tomatoes, basil, and mozzarella brings a delightful and festive touch to your picnic spread.
-
Chips or Crackers: Crispy potato chips or whole grain crackers add crunch and a bit of saltiness that perfectly complements the sandwich’s flavors.
-
Iced Tea: A tall glass of refreshing iced tea – whether sweetened or unsweetened – adds a soothing element, enhancing the leisurely vibe of your outdoor meal.
-
Sparkling Water: Light and bubbly, sparkling water provided a refreshing quench, perfectly cleansing the palate post-bite.
-
Cheesecake Bites: For dessert, mini cheesecake bites offer a creamy finish to the meal, satisfying any sweet cravings without overwhelming the taste buds.
Experiment with these pairings, and watch as your Pressed Italian Picnic Sandwich Loaf becomes the star of your outdoor feasts!
Make Ahead Options
The Pressed Italian Picnic Sandwich Loaf is a fantastic option for meal prep, saving you time on busy weeknights! You can easily assemble the sandwich and refrigerate it up to 24 hours ahead of time, allowing the flavors to meld beautifully. Start by hollowing out the bread and layering the ingredients as directed, making sure to apply a generous amount of olive tapenade to protect against moisture. Wrap the entire loaf tightly in plastic wrap and aluminum foil, then place a weight on top to maintain its shape. When you’re ready to serve, simply slice and enjoy this delicious, ready-to-eat meal that promises exceptional taste and convenience!
Italian Picnic Sandwich Loaf Recipe FAQs
How do I select the best bread for my Italian Picnic Sandwich Loaf?
I recommend choosing sturdy breads like ciabatta or focaccia, as they provide a solid base that prevents a soggy sandwich. Look for a loaf with a crispy outer crust and soft interior, ensuring it holds up well against the layers of flavorful ingredients.
How should I store my Italian Picnic Sandwich Loaf?
Wrap your sandwich tightly in plastic wrap and aluminum foil to keep it fresh. When stored in the refrigerator, it will last for up to 3 days. The flavors meld beautifully as it sits, so don’t be afraid to make it a day in advance!
Can I freeze my Italian Picnic Sandwich Loaf?
Absolutely! For freezing, slice the sandwich into individual portions and wrap each slice carefully in plastic wrap before placing them in an airtight container. They can stay frozen for up to 2 months. When ready to enjoy, simply thaw them in the fridge overnight. For a warm, crispy finish, heat the slices in a toaster oven!
What if my sandwich becomes soggy?
To prevent sogginess, always layer the meats at the bottom and use drier ingredients. Blot fresh veggies like spinach and roasted peppers before adding them to avoid moisture buildup. If you detect sogginess, try adding a layer of cheese that can absorb some moisture.
Are there any dietary considerations for the Italian Picnic Sandwich Loaf?
Definitely! This sandwich can be customized to accommodate various dietary preferences. For vegetarian options, omit the meats and opt for grilled vegetables and hummus. If you’re avoiding gluten, consider using lettuce wraps or hollowed bell peppers instead of bread. And always check for specific allergens in your ingredients to ensure everyone can enjoy it!
Ultimate Italian Picnic Sandwich Loaf for Outdoor Feasts
Ingredients
Equipment
Method
- Begin by slicing off the top of your loaf of sturdy bread, like ciabatta or focaccia. Carefully hollow out the insides, leaving about a 1-inch thick shell all around.
- Spread a generous layer of olive tapenade on the inside of both the base and the lid of your hollowed loaf.
- Starting with salami, layer your ingredients inside the loaf, slightly overlapping each piece for stability. Follow with ham, roasted peppers, fresh spinach, and cheese.
- Once you’ve layered your ingredients, place the lid back on top of the loaf and securely wrap it in plastic wrap followed by aluminum foil. Weigh the sandwich down and refrigerate it for at least 8 hours, ideally overnight.
- After chilling, unwrap your sandwich from the fridge, and carefully remove any weights. Using a sharp knife, slice the sandwich into manageable portions.
Leave a Reply